I am always looking for drills that incorporate more than just one basketball fundamental into the drill. The L-Shooting drill combines elements from both dribbling and shooting to do that. It is a simple drill that any player will be able to do once they are able to dribble the ball. It is easy enough to do at the younger ages and can be scaled up into a more difficult drill at the older ages. It does not take a lot of time and can be done every practice if you want.
The drill can be done with two lines going at the same time for both the layup and jumpshot portions of the drill. Each line will have their own basketballs and will be performing the same thing just on opposite sides of the floor.
The kickout portion of the drill will have the two lines on each side of the floor but now only one line has a ball. This line will be the passer. The 2nd line will be the receiver and shooter during the drill. This portion makes both lines work in unison while the first two portions of the drill will have each line working independently of the other.
The lines of the drill will start at mid-court on the sideline. Again, both sides of the court can be used. I will normally run the drill with anyway from 2-4 basketballs in each line. 2 balls will allow more coaching to take place to fix any mistakes the players are going to be making. 4 balls are going to allow more pace and more shots being taken by the players.
Depending on what I am trying to accomplish during the drill will determine how many basketballs I use in the drill. In season, early practices will have the drill using 2 balls per side to work on fundamentals and good habits. Once those habits have been formed, I then increase the number of basketballs per side as the season moves towards the end.
Out of season, the number of balls per line will be determined by what I am trying to accomplish. If I am wanting a bunch of shots, then I will use more basketballs. If the players are skilled, then I will use more basketballs. However, if the players are younger or the fundamentals are not ingrained in the players, then I will reduce the number of balls to help correct any problems that each player may show during the drill.
Once every player is in line with the number of basketballs that the drill is using for that day, the drill will begin. If there is enough time, I will have the players start with layups, then move to jumpshots, before finishing with kickout shots. This will get all players shooting shots at the rim, mid-range, and finally 3-point shots. I start with the closer shots first, and move the players farther away from the basket as the drill continues.
L-Shooting Layups
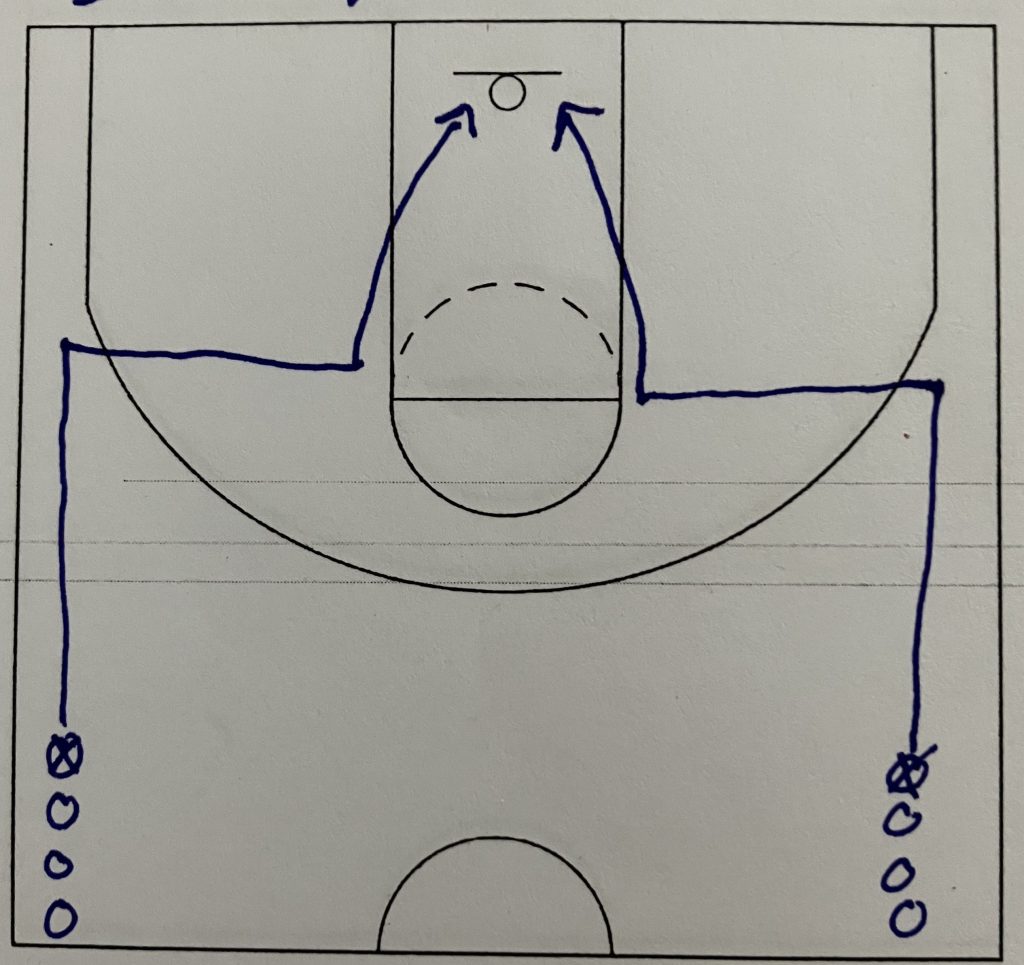
The first player in the line will dribble straight down the sideline to the wing area, foul line extended area. They will perform a change of direction dribble. Depending of the age and skill level, this may be a crossover, behind the back, between the legs, or spin move.
As the ball is moving from the outside hand to the inside hand on the change of direction, the player should try to explode out of the move as quickly as possible. The player is going to take the burst of speed to the elbow. This burst of speed is to try and simulate creating space against a defender in an actual game.
Now the player will get to the elbow and again use a change of direction dribble. The same four moves can be used to get the ball back out to the outside hand. Off of this move, the player at the high school level should be trying to explode and use only one more dribble to shoot a layup. By restricting the players to only one dribble, it forces them to explode and cover as much distance as possible with as few steps as possible. This is trying to work on creating separation against a potential defender.
The player collects their ball after making the layup and goes around the outside to the other side. The player will give their ball to the next player in line and go to the back of the line to wait their turn, now on the other side of the floor. By switching sides of the floor, the players will begin the drill with both their right hand and left hand depending on which side of the floor the line is on.
The outside hand should be used to start the drill to simulate a defender being in between the player and the basket. This is going to put the defender closer to the inside hand forcing the offensive player to use their outside hand. So, when facing the basket, the right hand should start the drill when the player is on the right side of the court. And they should use the left hand when on the left side.
After each player shoots a couple of layups from both sides, then I will have the players start taking jumpshots.
L-Shooting Jumpshots
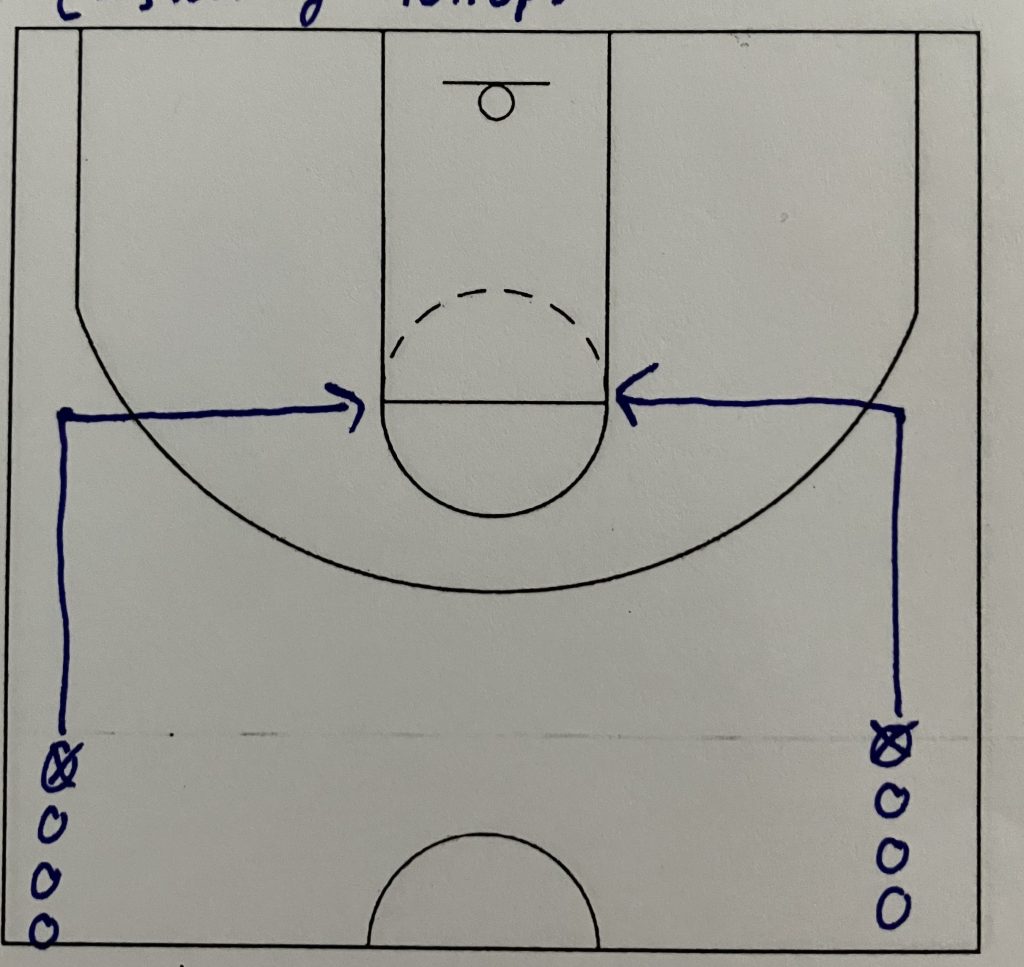
The movement is all the same expect instead of doing a change of direction like a crossover at the foul line to shoot a layup, the player will pull up into a jumpshot at the elbow. The rest of the drill stays the same.
The player starts with the outside hand dribbling down into the wing area. They will perform a change of direction dribble like a behind the back. They will burst out of the behind the back dribble towards the elbow. When reaching the elbow area, they will perform a jumpshot.
I want the players shooting mid-range shots. This could be anywhere from the mid-post area like at 6-8 foot to just inside the 3-point line at around 12-15 feet. I want the players to be shooting at the different distances during the drill because the defense can rotate at different points during a drive. An early rotation will have the offensive player shooting earlier at around 12-15 feet. A slow rotation will have the offensive player shooting at 6-8 feet. A rotation somewhere in between will have the shot around the 10-foot mark right around the elbow itself.
Offensive players need to be comfortable shooting at all 3 mid-range locations so the defense cannot exploit a shooting weakness out of the offensive player. Bad distance shooters can have early rotations causing them to shoot longer shots. Some players will not shoot the 6–8 foot jumpshot. If they get that close, then they are going all the way to basket. They can have a good defensive team rotate late knowing they can force a bad shot attempt at the rim. Or they can slide over late for a potential charge. So, I want the offensive players comfortable pulling up from all 3 mid-range locations.
Once the players get good mid-range shots up, then I will move to the last stage of the drill which is the kickout 3-point shot.
L-Shooting Kickouts
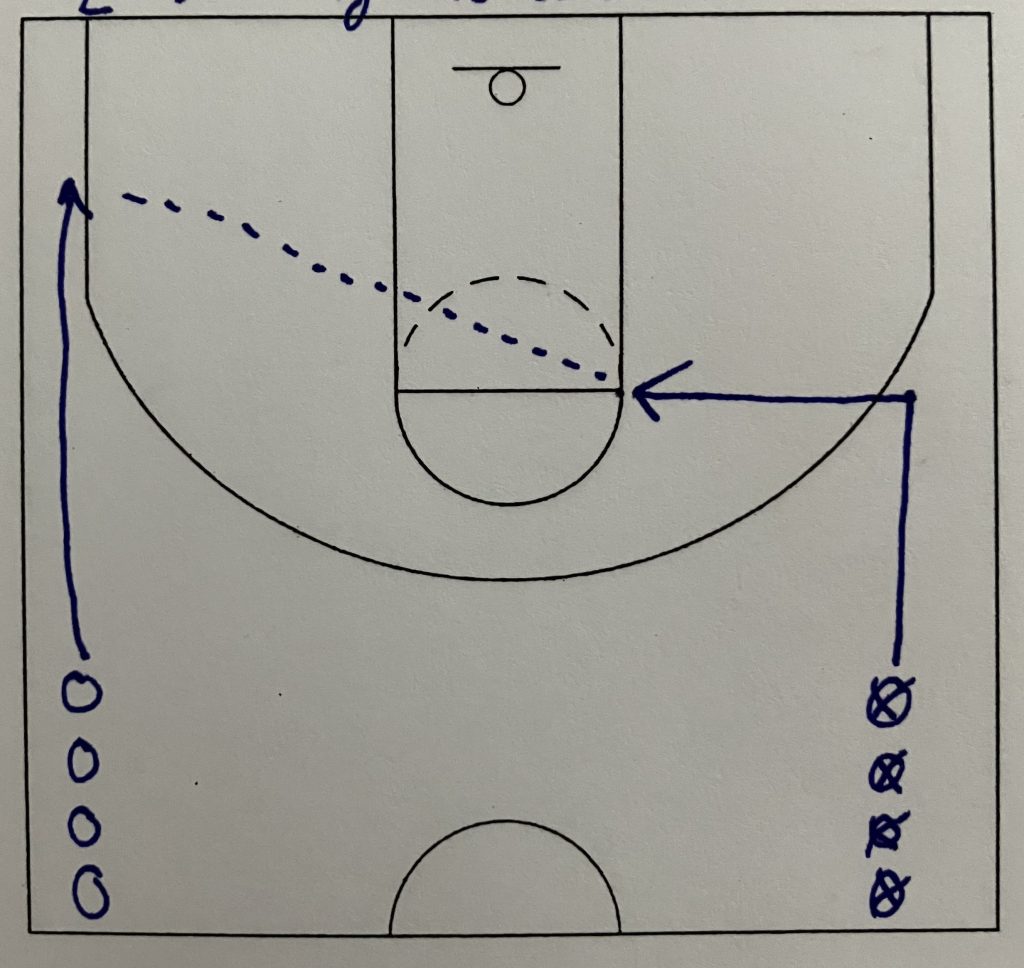
Now only one line has basketballs. The line with the basketball continues on the same way as before. They dribble down the sideline. They change direction dribble in the wing area. They attack the elbow off of the move.
As the ball handler is moving down to the wing area and changing direction, the 2nd line is running down the opposite side stopping anywhere from the corner up to the wing. As the ball handler reaches the elbow, they are going to make a pass to the player running down the sideline.
The 2nd line players will start without the ball. They will run down the sideline. As the ball is passed to them, they will set their feet, catch and shoot the 3-point shot. This shot can take place anywhere from the wing down to the corner.
After a couple of times with every player going through the drill, the ball should switch the lines it is starting in. By changing the line the ball starts in, will force the players to dribble and pass with different hands. It will also require the shooters to step into their shot using a different foot getting planted down first. These are little things but they can make a major difference in a game. The quicker a player can catch and shoot, the more likely the shot will not be blocked.
Conclusion
This drill helps to combine both shooting and dribbling which are key components to a good offensive team. Anytime a drill can use dribbling, passing and shooting it is a good thing. It does not have to take up a lot of practice time to be useful either. A 15-minute period in practice is all that is needed to get through all of the drill.
This is one of my go to drills because it works on multiple offensive skills without taking up a lot time. It is quick and the rewards are good.
And this is something that can be tweaked if you are wanting to work on a certain skill. A pump fake and step through can be added without changing the drill. There are all kinds of additional skills that can be worked on within the drill. All of the little nuances that can be added just take this drill to a whole other level.

2 thoughts on “L-Shooting Drill”