Here are 6 stack formation plays from a baseline out of bounds throw-in. This is to showcase some of the versatility of the stack formation. In the 6 plays that follow I have done two things to hopefully help you install these plays.
- The players start in the same position for each of the 6 plays.
- All 5 players have a play designed to get them a shot.
I have started the players in the same spot for each play for two reasons.
- This should help your team remember the plays better because they do not have to think about where to line up. They start in the same position each time. This should reduce confusion and the amount of time it takes to line up.
- As an opposing team is scouting you, having the same setup but different plays makes it harder for a team to know what you are doing. If they do not know what you are doing then it makes it harder for them to defend.
I have also designed the 6 plays so that each player has a play specially for them to shoot the ball if executed correctly. This setup gives you as the coach the ability to call a play for a certain player. It also gives you the coach the ability to keep a player who is not shooting well that night from getting an extra shot.
So I am going to break these 6 plays into 3 sections. The first two are inside shots. The middle two will be screen and drives. The last two will be 3 point shots. Realize that a couple of plays work as a counter to another play. In trying to separate the plays, this is how I have decided to do it. Some of the plays can be grouped into pairs and installed together even though one play is an inside shot and the other is an outside shot. So the inside shots.
Play #1 and 2
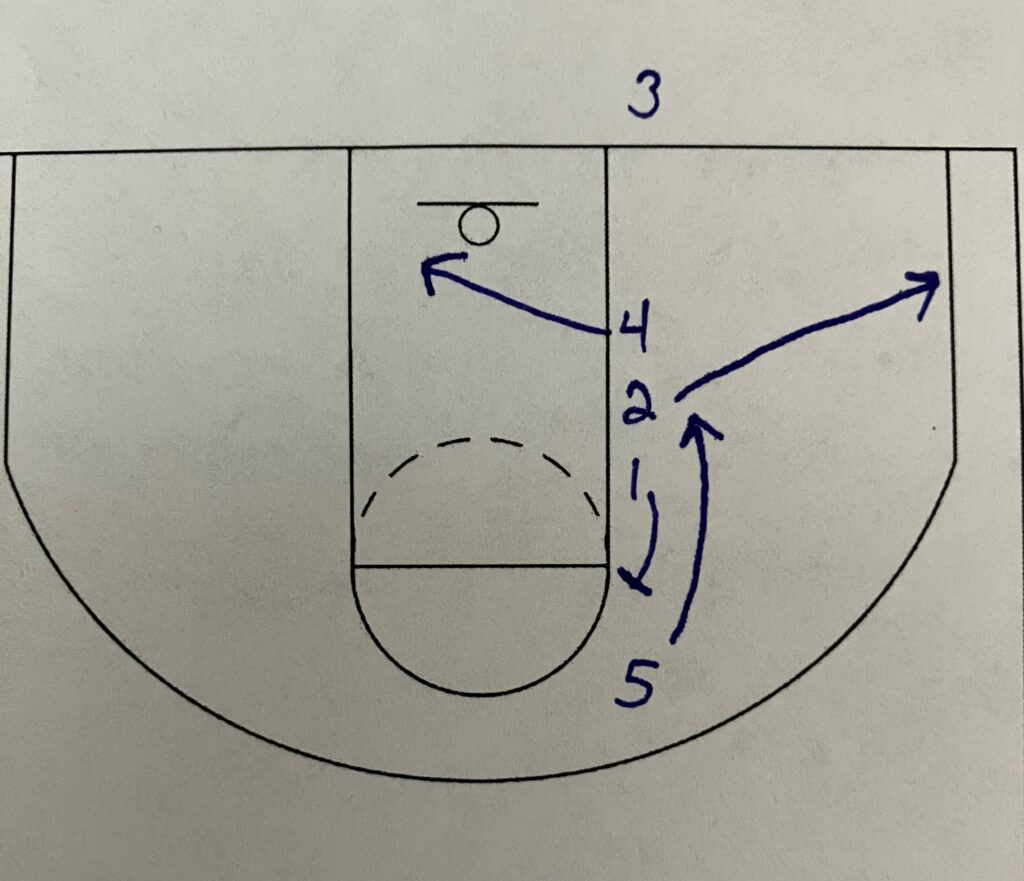
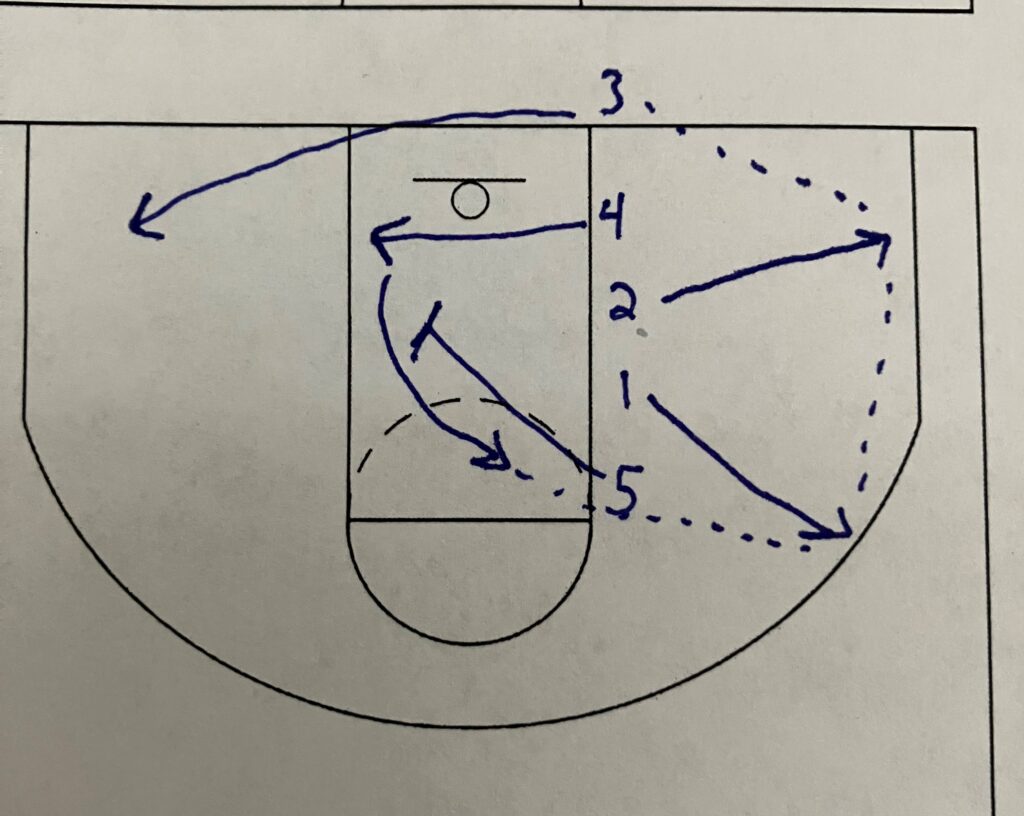
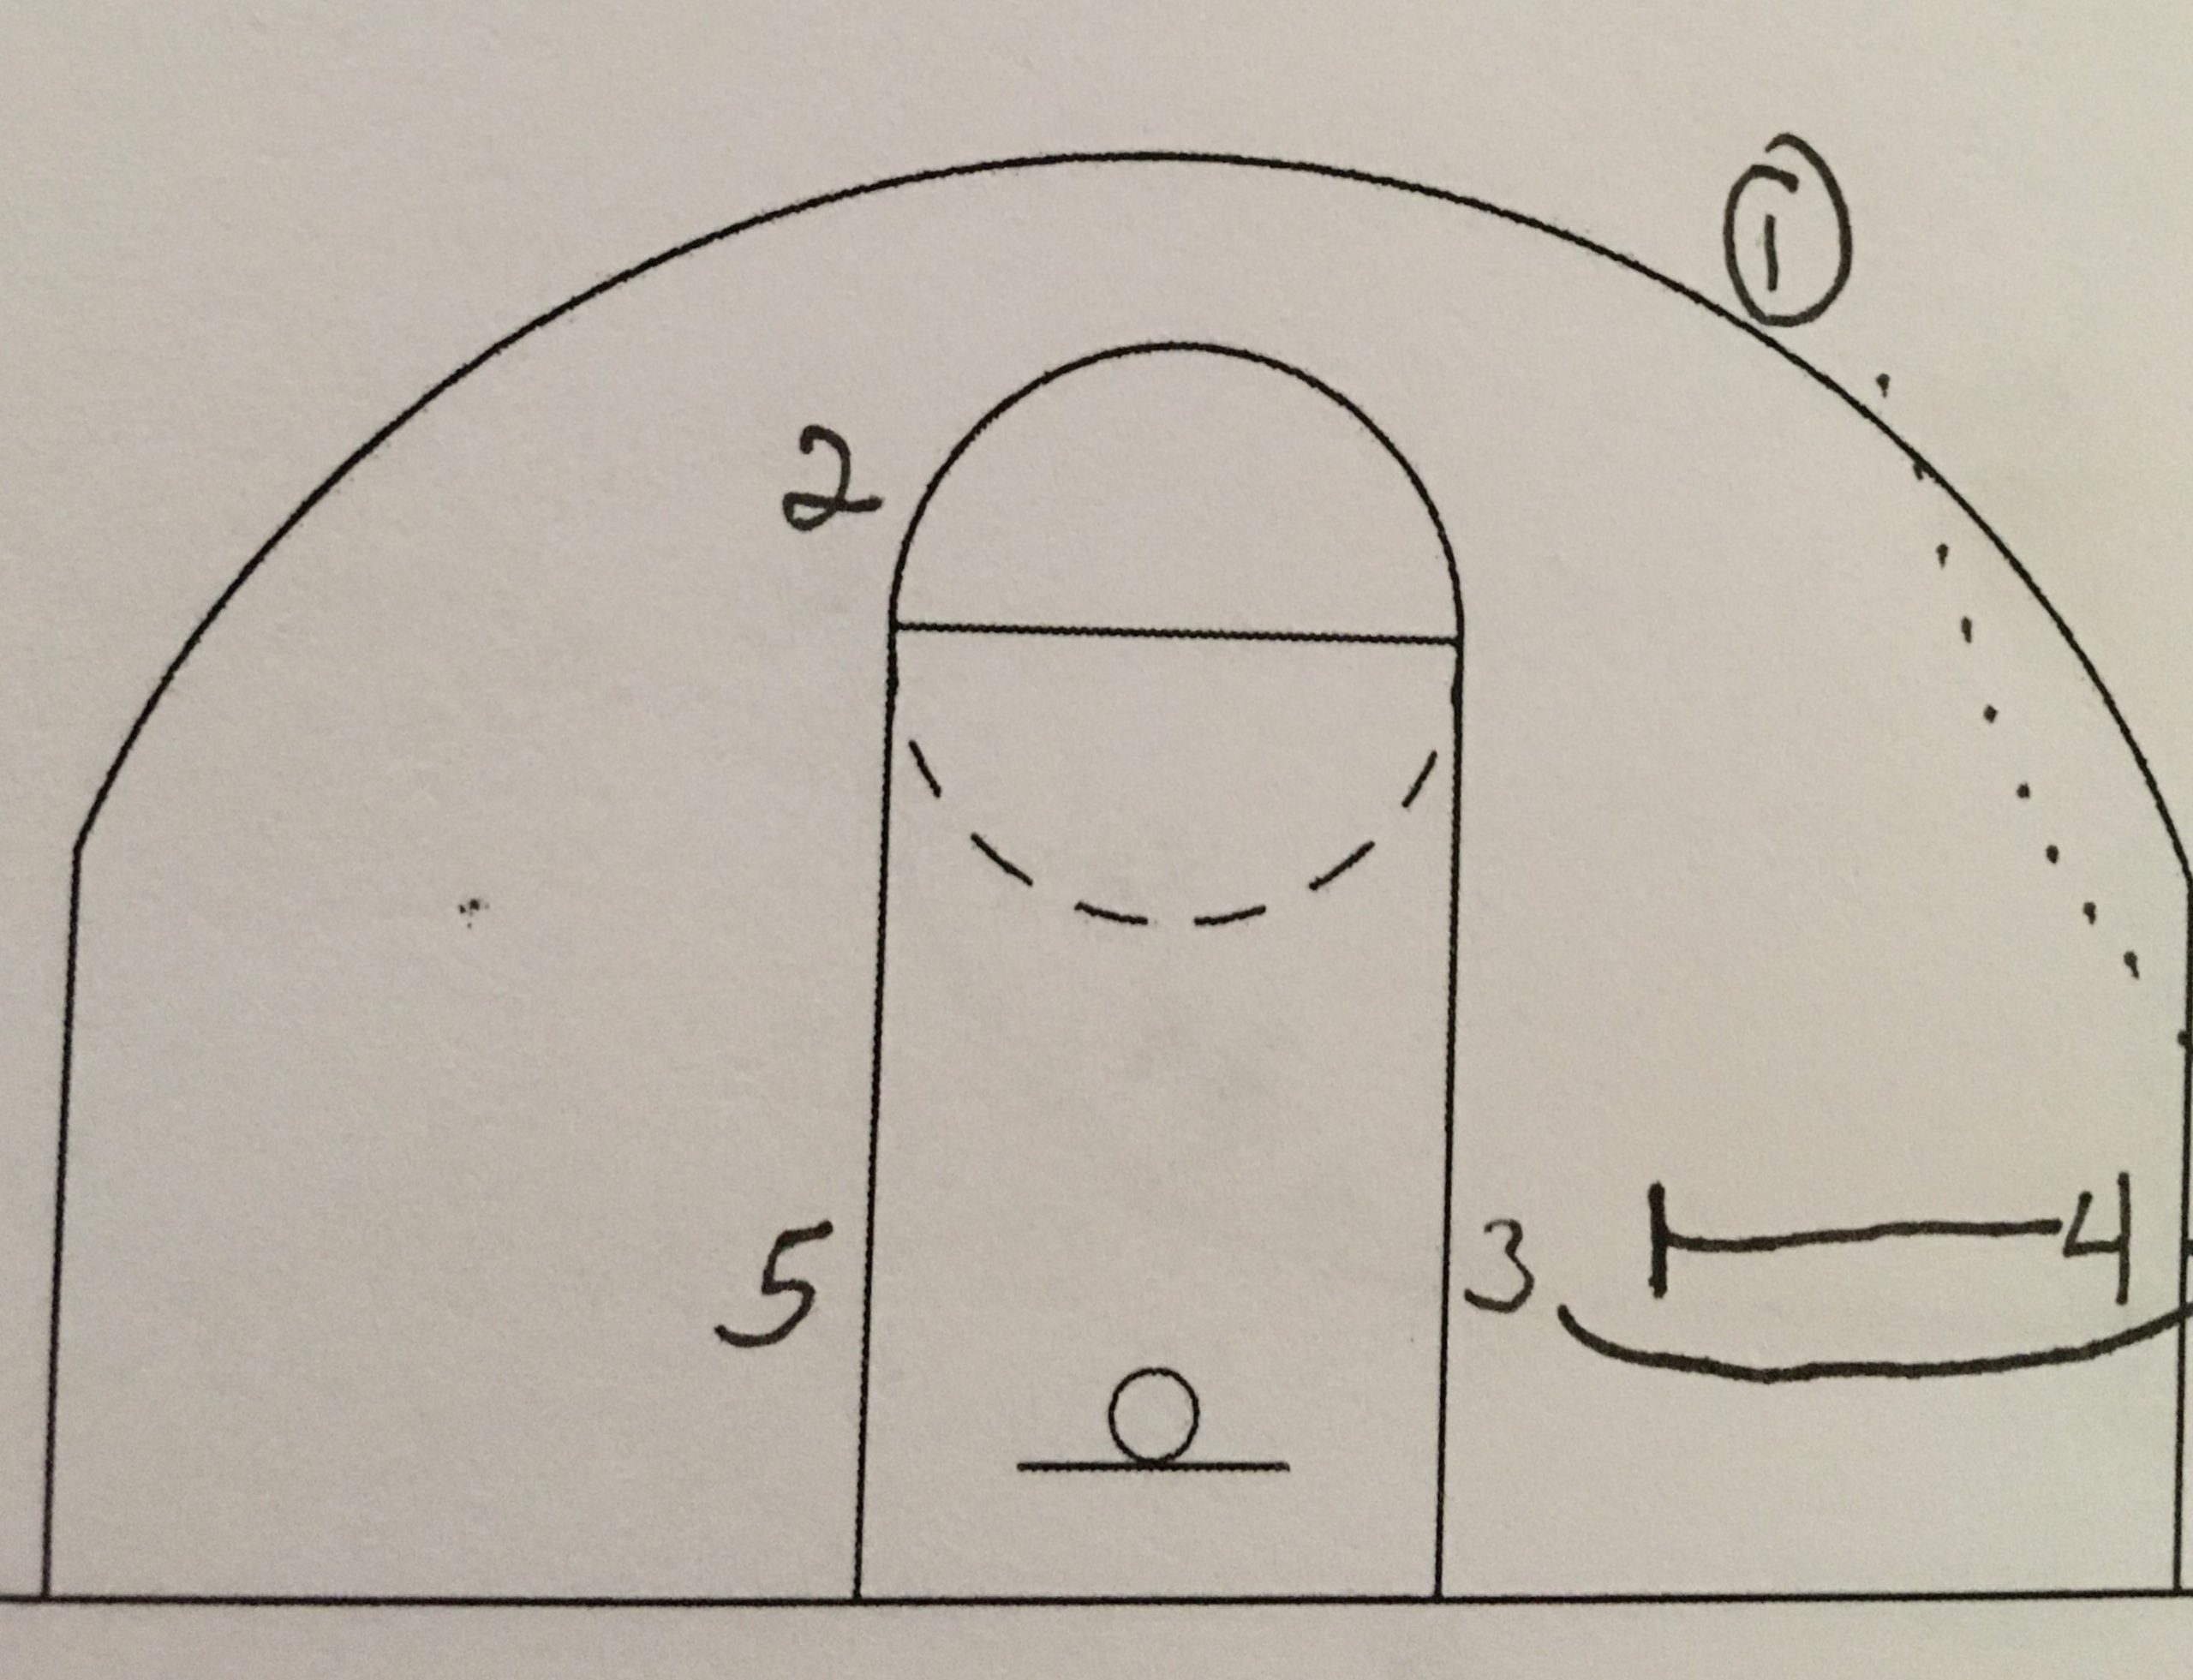
The setup is as follows. The 3 man will always take the ball out of bounds. The 4 man is in the front. Then the 2 man, 1 man and finally the 5 man is in the back. This will be the setup for every play.
Play #1
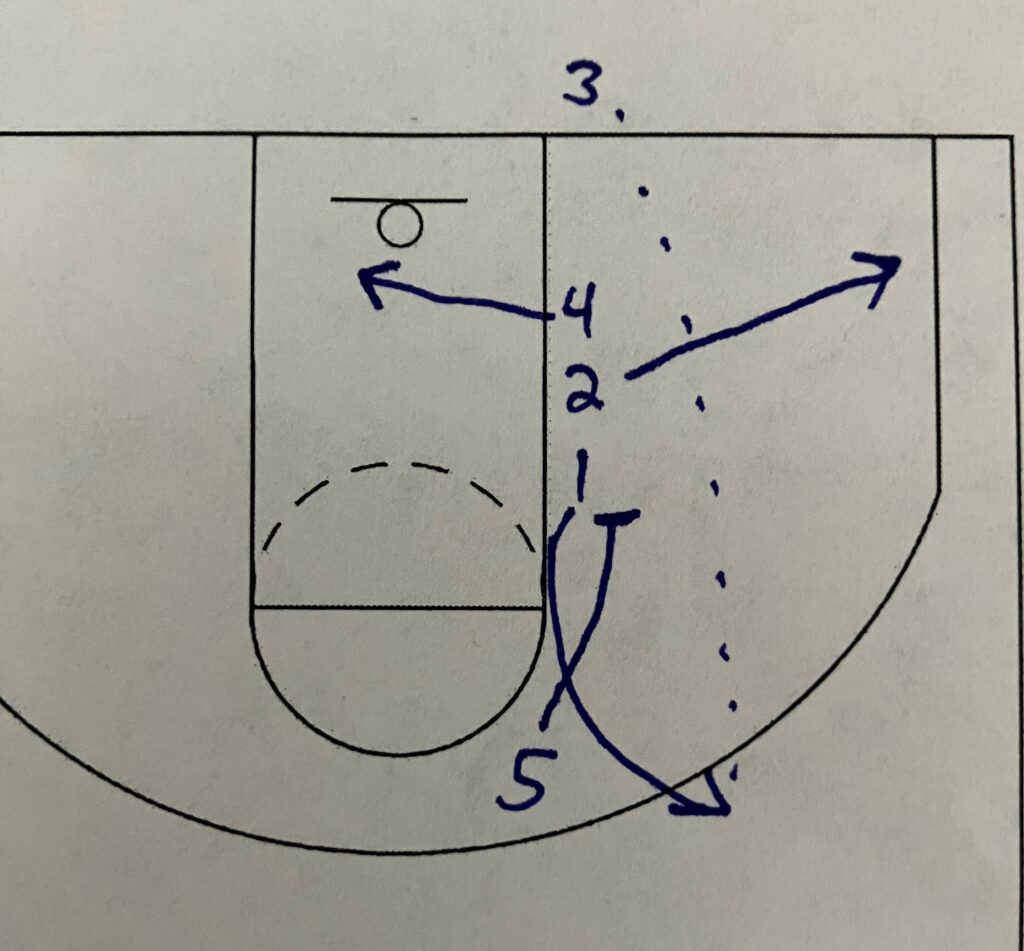
The first play is the on the above left. This is what I would consider the standard stack formation play. It can be run slightly different then this but this is how I run it. This will make sense as to why I setup this way later on in the series of plays. So the 4 man cuts across to the opposite side of the basket. The 2 man cuts to the corner. The 1 man turns and sets a screen for the 5 man cutting straight down the line for a pass and basket. When installing a stack formation, this is normally the first play installed.
Play #2
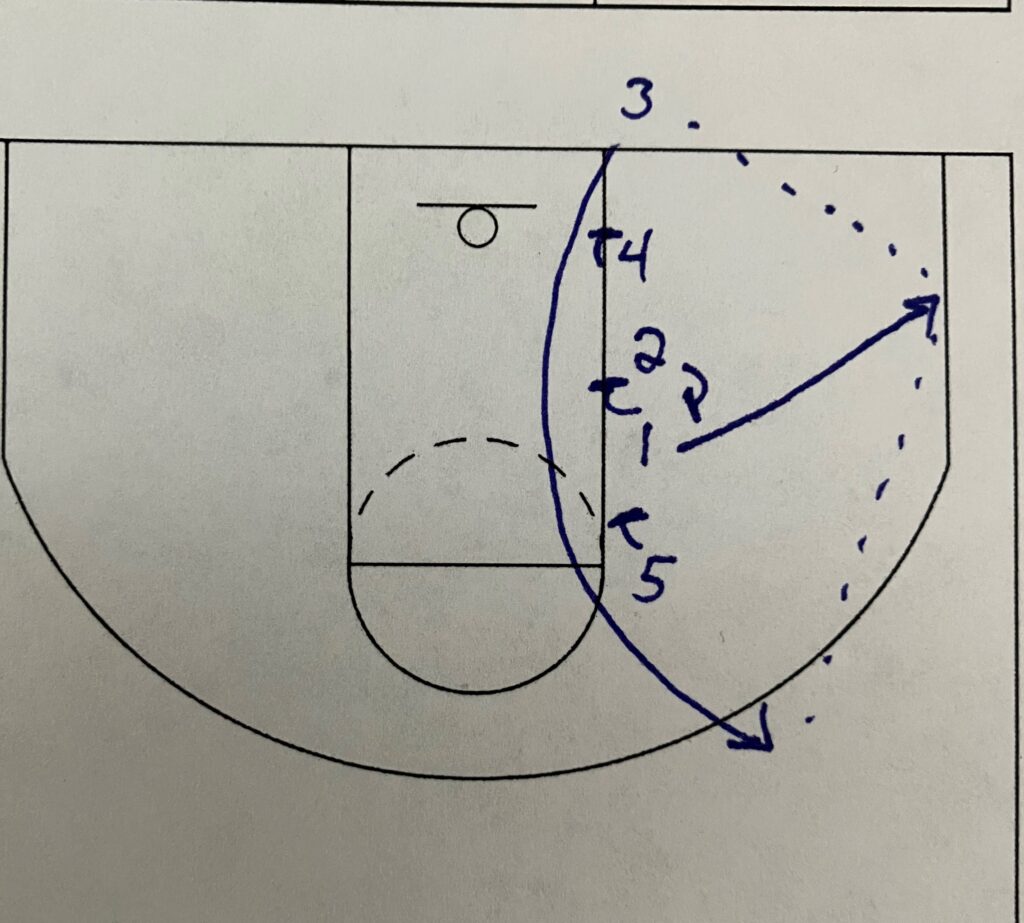
The second play on the right is designed to get the 4 man a shot. The 4 man and 2 man make their same cuts. The ball enters to the corner. The man 1 now cuts out instead of setting the screen. The 2 man passes up the sideline to the 1 man. Now the 5 man goes across and sets a screen to bring the 4 man back across to ballside. The 1 man passes to the cutting 4 man hopefully in the middle of lane but at least by the elbow for the 4 man to get a shot off the screen and cut.
Now for the two plays using a ball screen and drive.
Play #3 and 4
Play #3
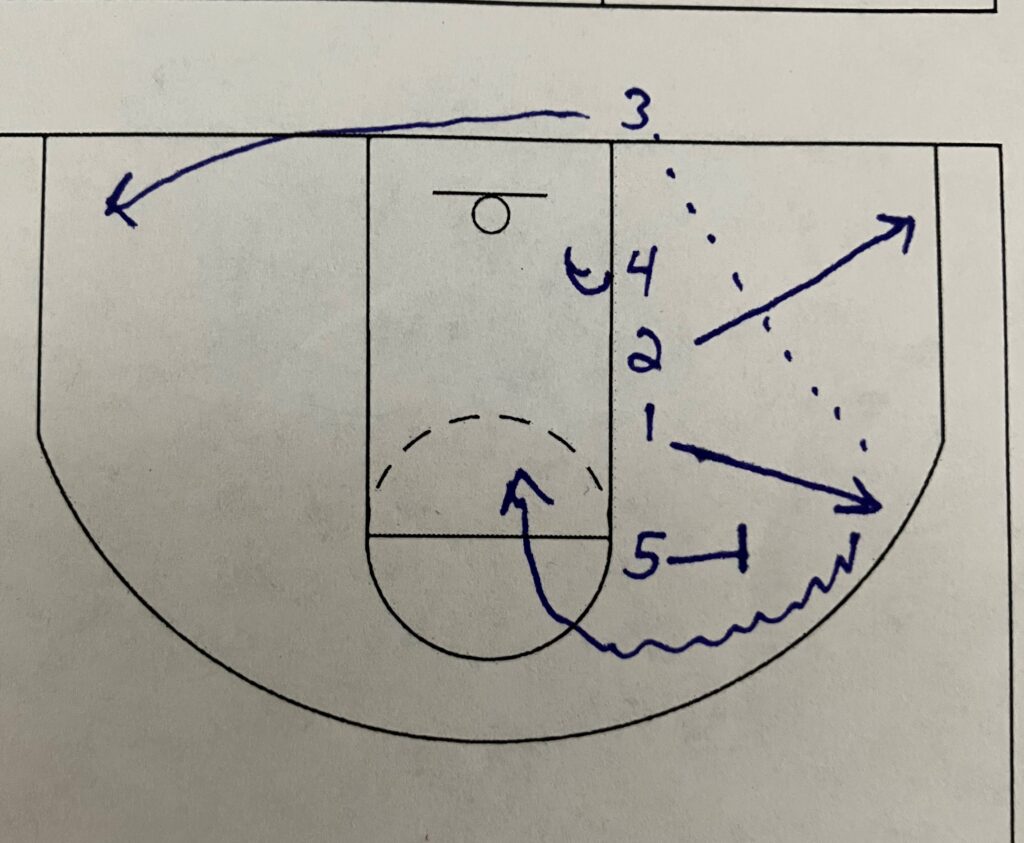
The first one on the left is very similar to the play for the 4 man. Couple of slight adjustments. I kept the 4 man ballside instead of cutting to the backside initially. This is to keep the backside as empty as possible. This empty space gives the 1 man more room to attack off the dribble. The 2 man cuts to the corner. The 1 man cuts out.
The ball enters to the corner and then up the sideline. The 3 man always cuts to the backside corner. This cut will give a kick out option to the drive. The play completely overloads one side of the floor and then attacks the backside.
The next adjustment to the 4 man play is the 5 turns and sets a ball screen instead of a cross screen for the 4. This should make it hard for the defense to know what is coming because the setup and initial movements are almost the same but then there is a small tweak in the offensive movement and these changes should lead to open shots.
So the 5 man sets a pick and pop for the 1 man. This will be a pick and pop so the 5 man does not roll off the screen into the 4 man already setup on the ballside block. This keeps the offense spaced out.
Now off the ball screen, the 1 man has the entire side of the floor to attack and create their shot or create a kick out shot for the 3. If nobody on the defense helps, then the 1 man should be able to get the ball to the basket. If a defender helps, then the pass goes to the teammate whose man helped the drive. If the 4 man defender steps across to help the drive then the dump pass to the 4 man should be open for the easy layup. Same goes for the 3 or 5 man’s defender. If they help, then the pass goes to them for a wide open outside shot.
Play #4
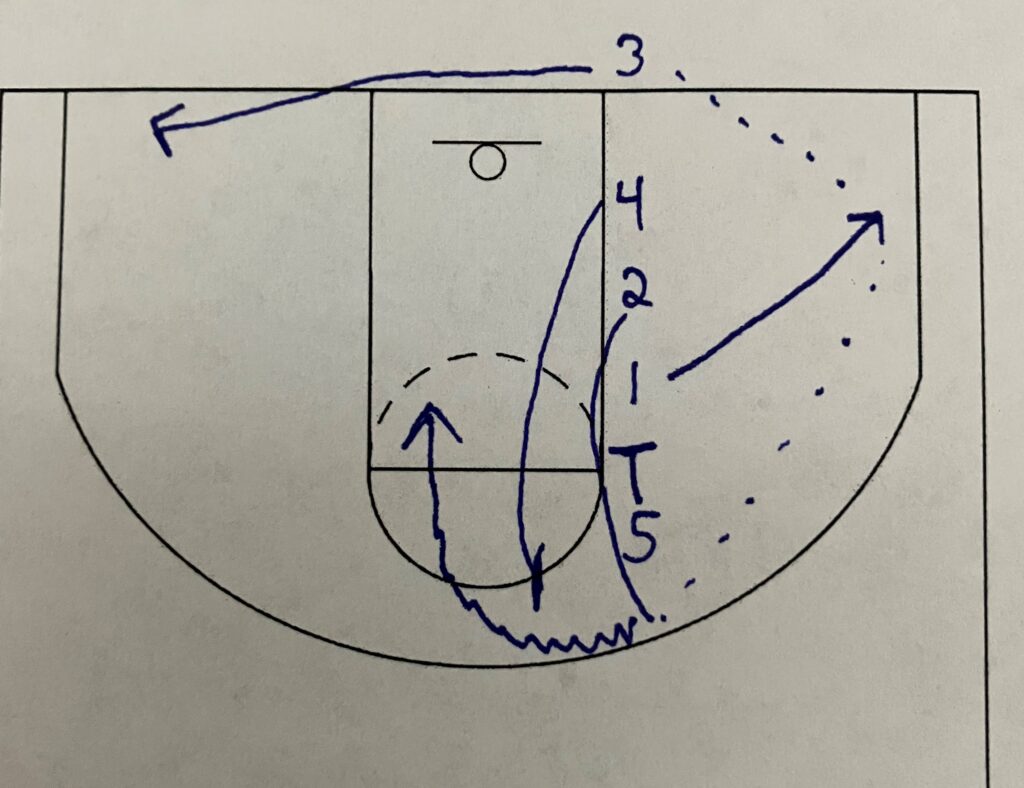
This next play for the 2 man has the most moving parts. The start is flipped from the last two. The 1 man cuts to the corner for the entry pass. The 5 man sets a down screen for the 2 man. This screen hopefully creates space from the defender for the 2 man. This space makes the pass from the 1 man to the 2 man easier and it creates a closeout from the defender. So the defender is rushing to get there.
After the screen the 5 man moves down to the block. The 4 man moves a half second after the 2 man so they are there early with the screen and not late. If the 4 man is late getting there then the defense has the time to recover and get set. On the catch, if the 2 man is open then he has a chance to shot the 3. If he is not, then he rips and comes off the ball screen set by the 4 man. The 4 man pops instead of rolls.
Again we want spacing between the 4 and 5. With the 5 man on the block already, the 4 man needs to stay high. The 3 man runs the baseline to the opposite corner ready for the drive. The 2 man has the entire backside again to attack.
Even though everything has switched for just about everybody in those two plays, the start and finish of the plays have the same spots filled. These two plays also give the coach the advantage of picking who they want to attack with the dribble. The team can take advantage of a mismatch for either the 1 or 2 man.
Play #5 and 6
The final two plays are designed to get a 3 point shot. And they are designed to get the shot quickly in the play.
Play #5
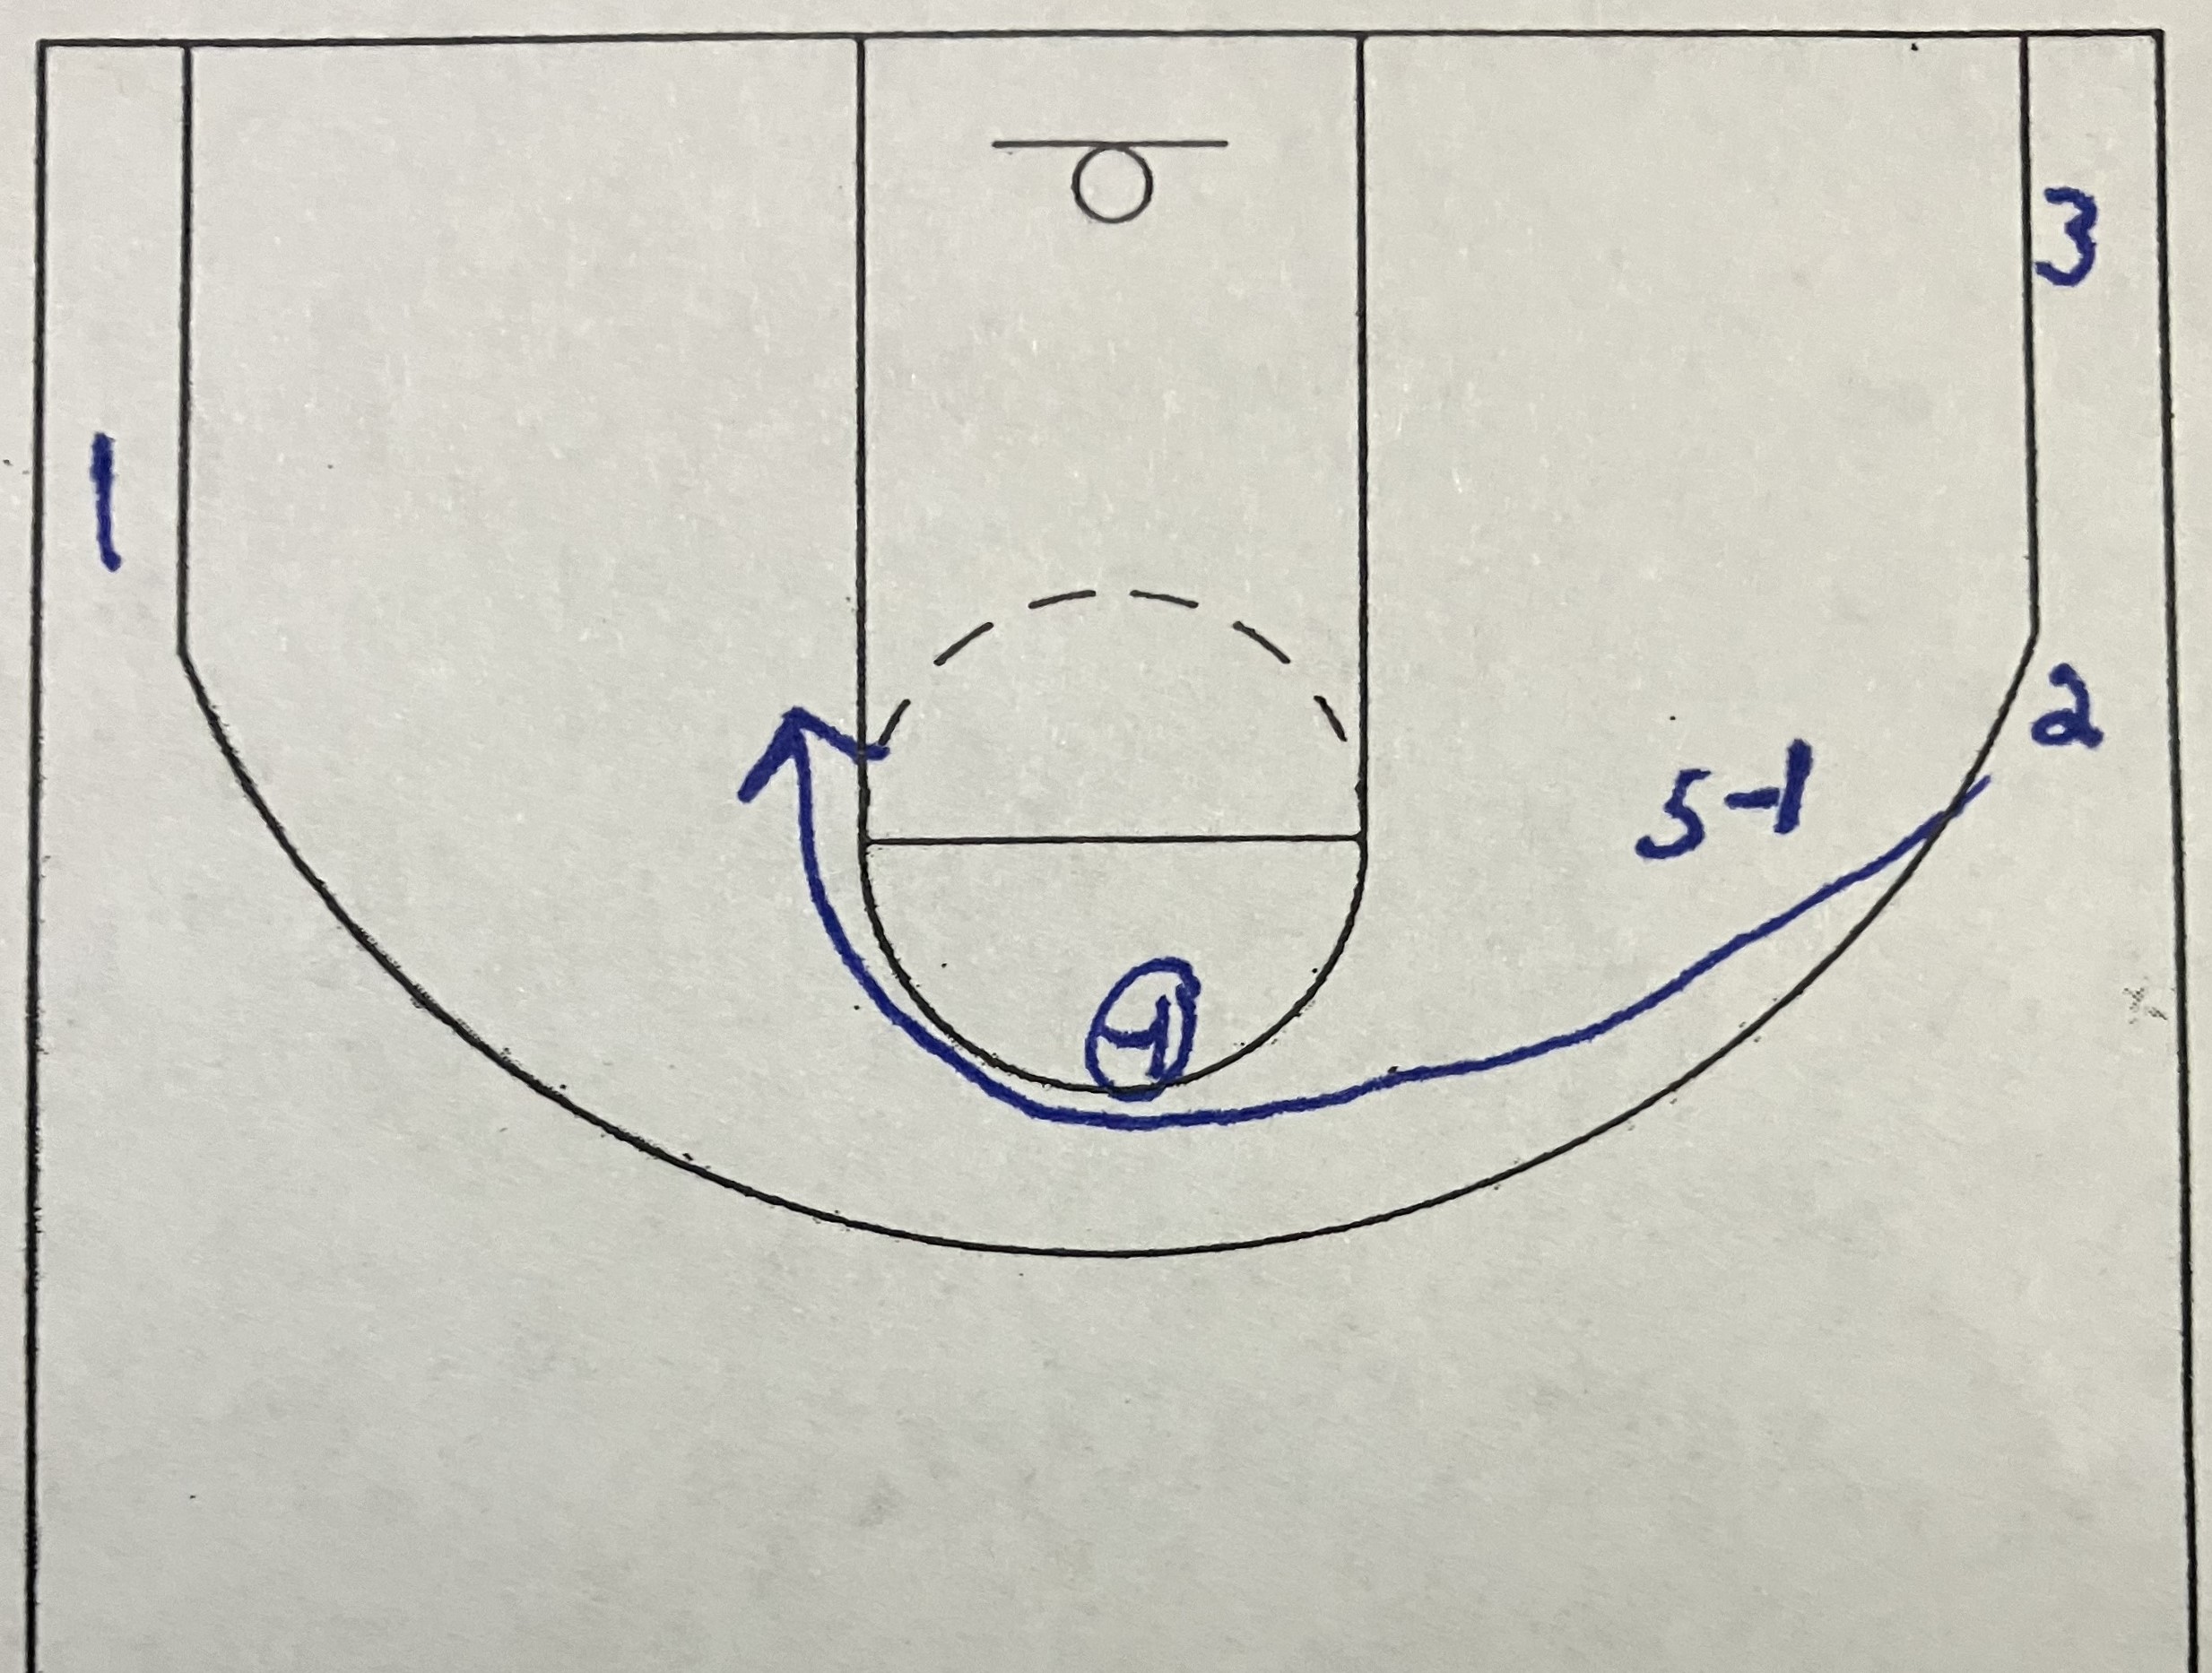
The first one on the right is designed to get the 1 man a shot. This is a counter to the original play I showed. The 4 and 2 both cut to their spots. Now if it is a last second shot needed or the defense is really collapsing on the cutting 5 man, then this is a good play to run.
The screen between the 1 man and the 5 is switched. The 1 man turns and sets up like he is screening but as the 5 man starts his cut down he goes straight to the 1 man’s defender and screens him. After the pause by the 1 man, he releases out to the 3 point line for the direct entry pass and shot. On a catch and shoot scenario this play can be ran with only about 1 or 2 seconds on the clock.
Play #6
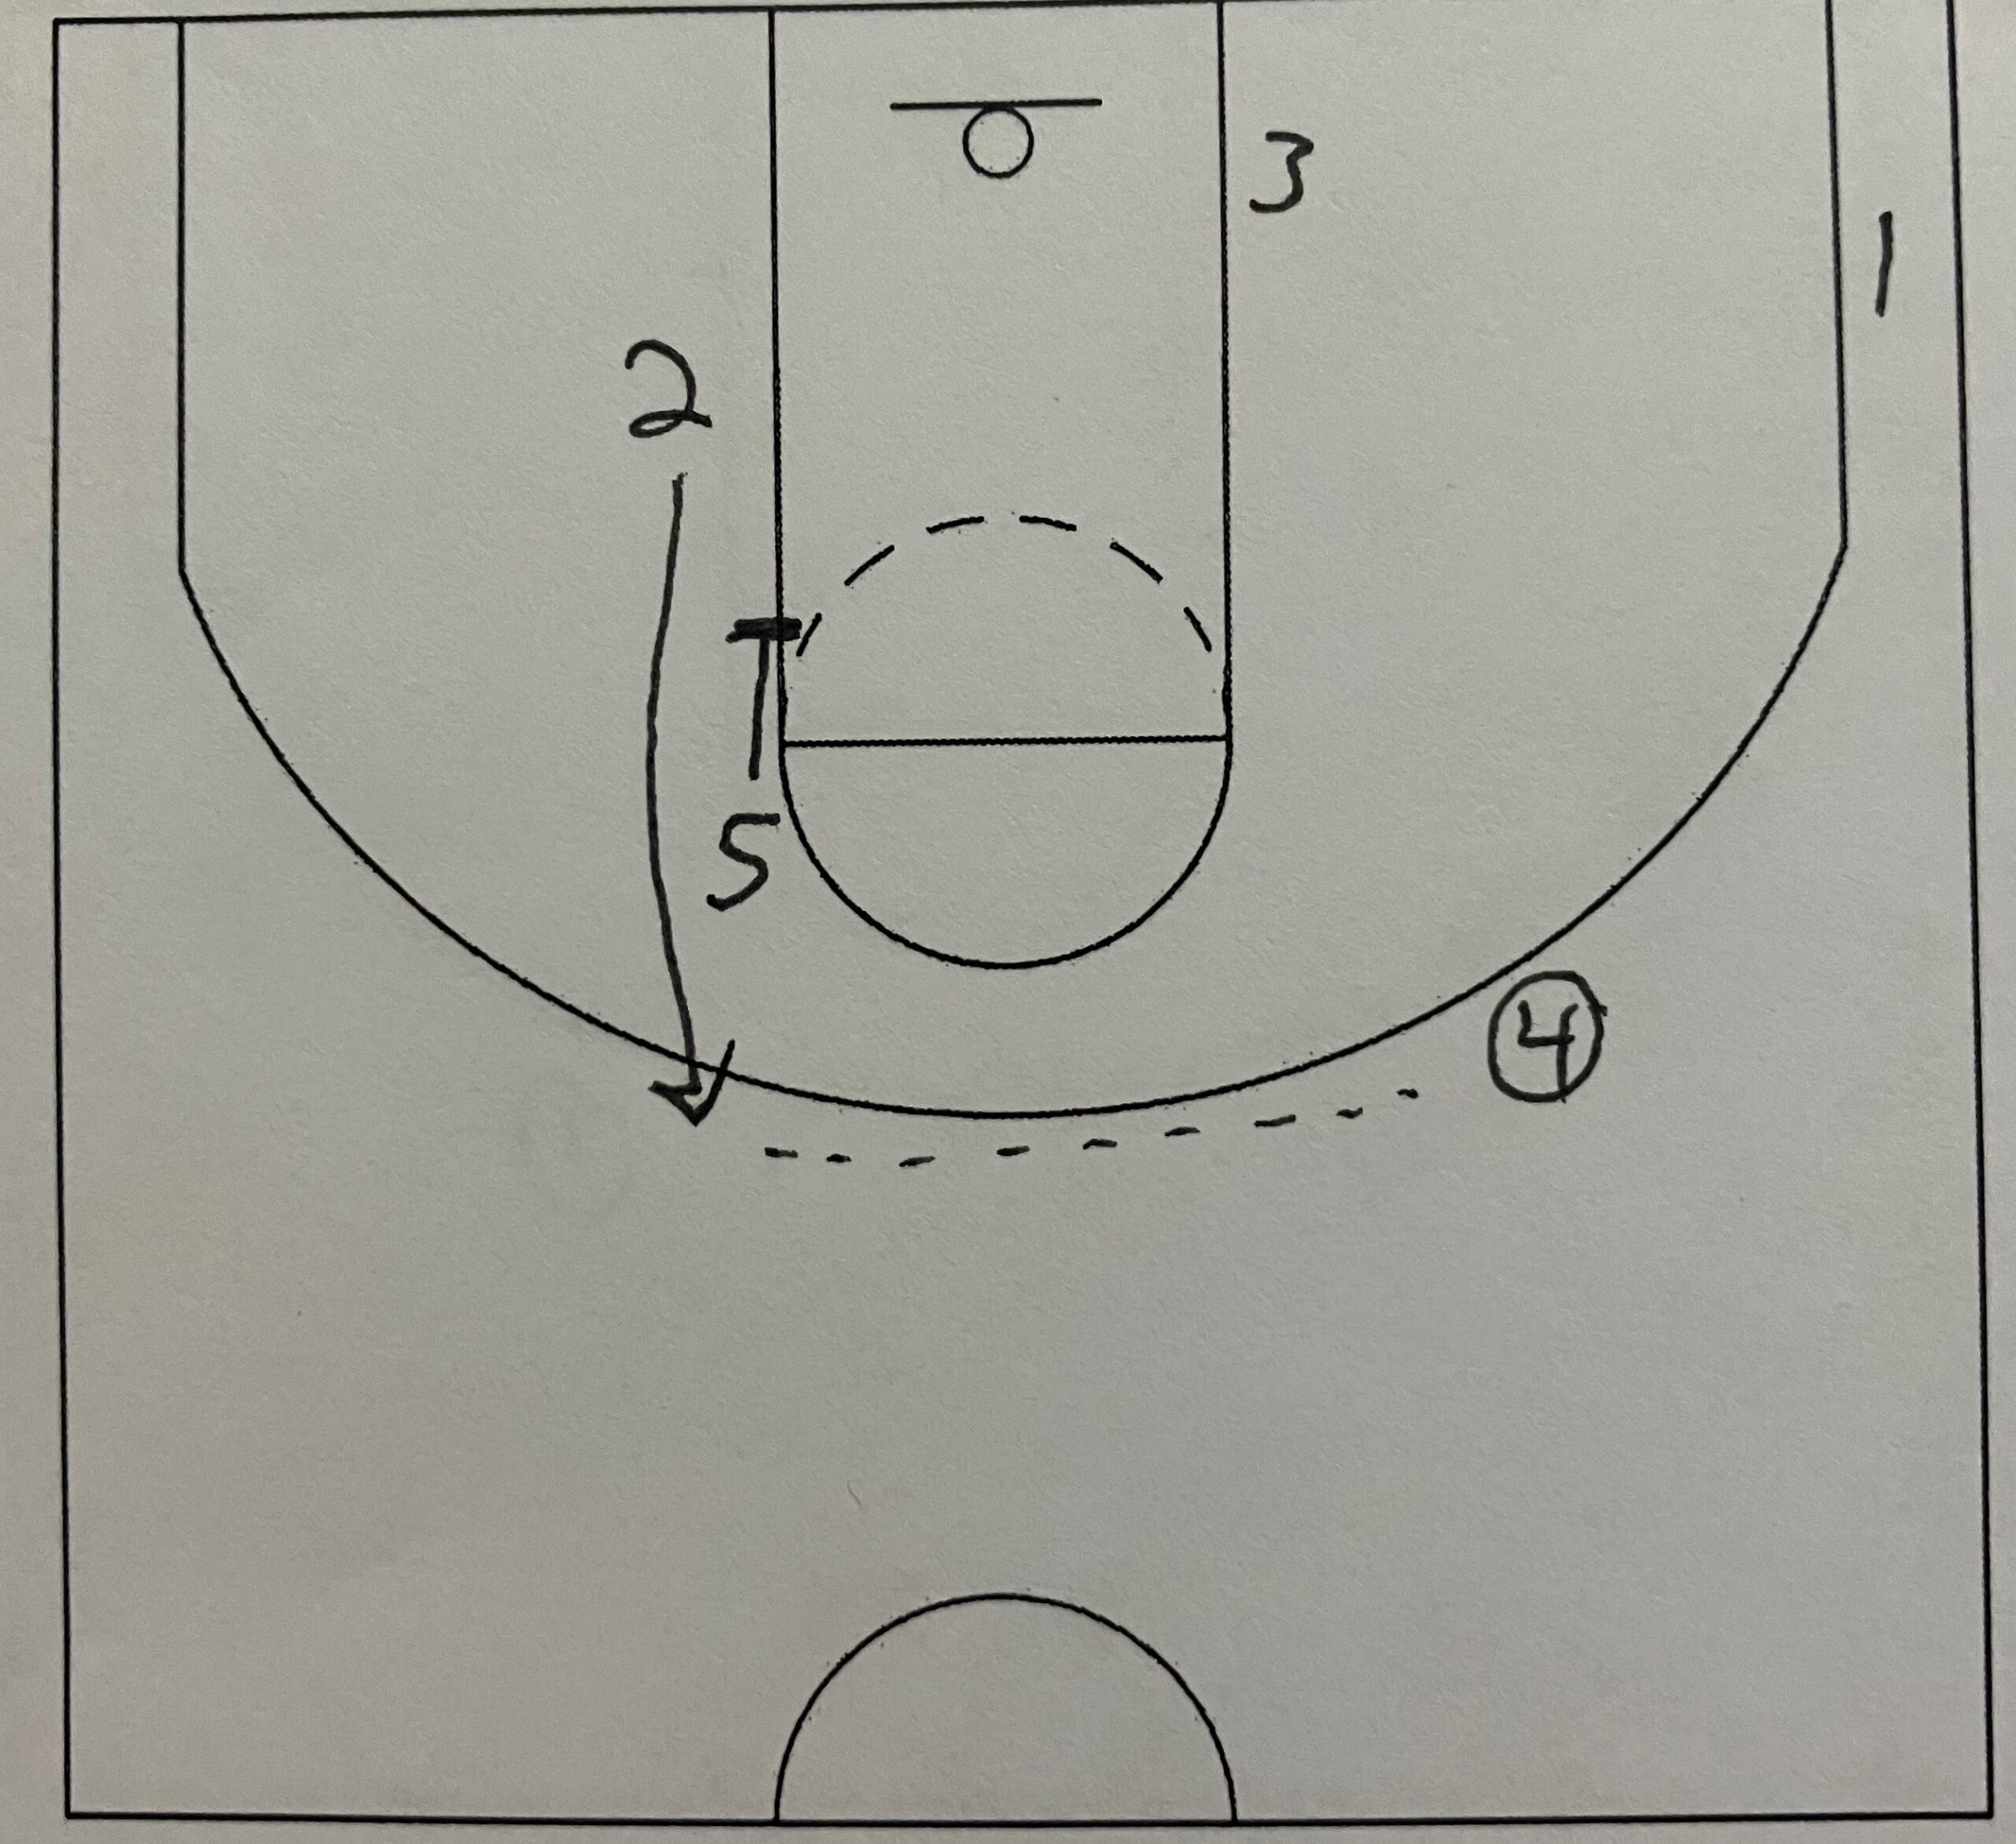
The second play designed for the 3 point shot is for the 3 man. I start with the 2 man turning and setting a ball screen for the 1 man. This simple screen helps to frees up the 1 man going to the cover. The screen makes the entry pass to the corner much easier.
After the entry pass, the 3 man cuts right up the stack formation. The 2 man will attempt to make the turn to get the third screen involved but if he does not get there then it becomes a double screen. The 4 man and the 5 man stay in place and set a screen for the 3 man. Again the 2 tries to get there for a triple staggered screen. The 3 man runs straight up to the 3 point line. The 1 man returns the pass and the 3 man is open for the 3-point shot after the triple screen.
I hope you can get some value out of these 6 plays. There are so many more plays out of the stack formation. New plays and new variations are always occurring so keep watching for more plays. Keep trying to make some changes and adjustments to give a new play a slightly different look then a similar play. If you have a variation or a play that has worked for you then comment down below and let me know. If I get some more plays out of the stack formation then I will do another post adding those plays in.

5 thoughts on “6 Stack Plays-Baseline Out of Bounds”