

No matter the age of the player or the skill of the player, dribbling is the most important skill of basketball. Dribbling drills should be fun for the players, but also have the ability to increase or decrease the difficulty to adjust the drill according to their age and skill. This adjustability can have a drill be used for 4th graders and varsity players at the same time.
The diamond dribbling drill is a great drill for any time of the year. I like to use it in season right at the beginning of practices to help get some fundamental work and the players moving. I will normally use this drill once a week throughout the season to get reinforcing dribbling skills.
I also use this drill throughout off season work. It works well with minimal players. It only takes 3 or 4 players to get the drill moving with little to no standing around and waiting. All of the different dribbling moves can be used in the drill. Both hands are going to be used to start each of those change of direction dribbles in the drill. So, it covers every dribbling skill within the drill. It can also be made more difficult or easier depending on the skill level of the players. Very few drills are able to work on all aspects of dribbling like this drill can.
Another reason why I really like this drill is because it does not take up a lot of space to complete the drill. It is contained within the width of the lane and the length of the 3-point line for the standard drill. This means players can work on the drill in their driveways at home or a playground at the school. The ability of the drill to be used with just about any basket makes it a great drill for players to use outside of the gym.
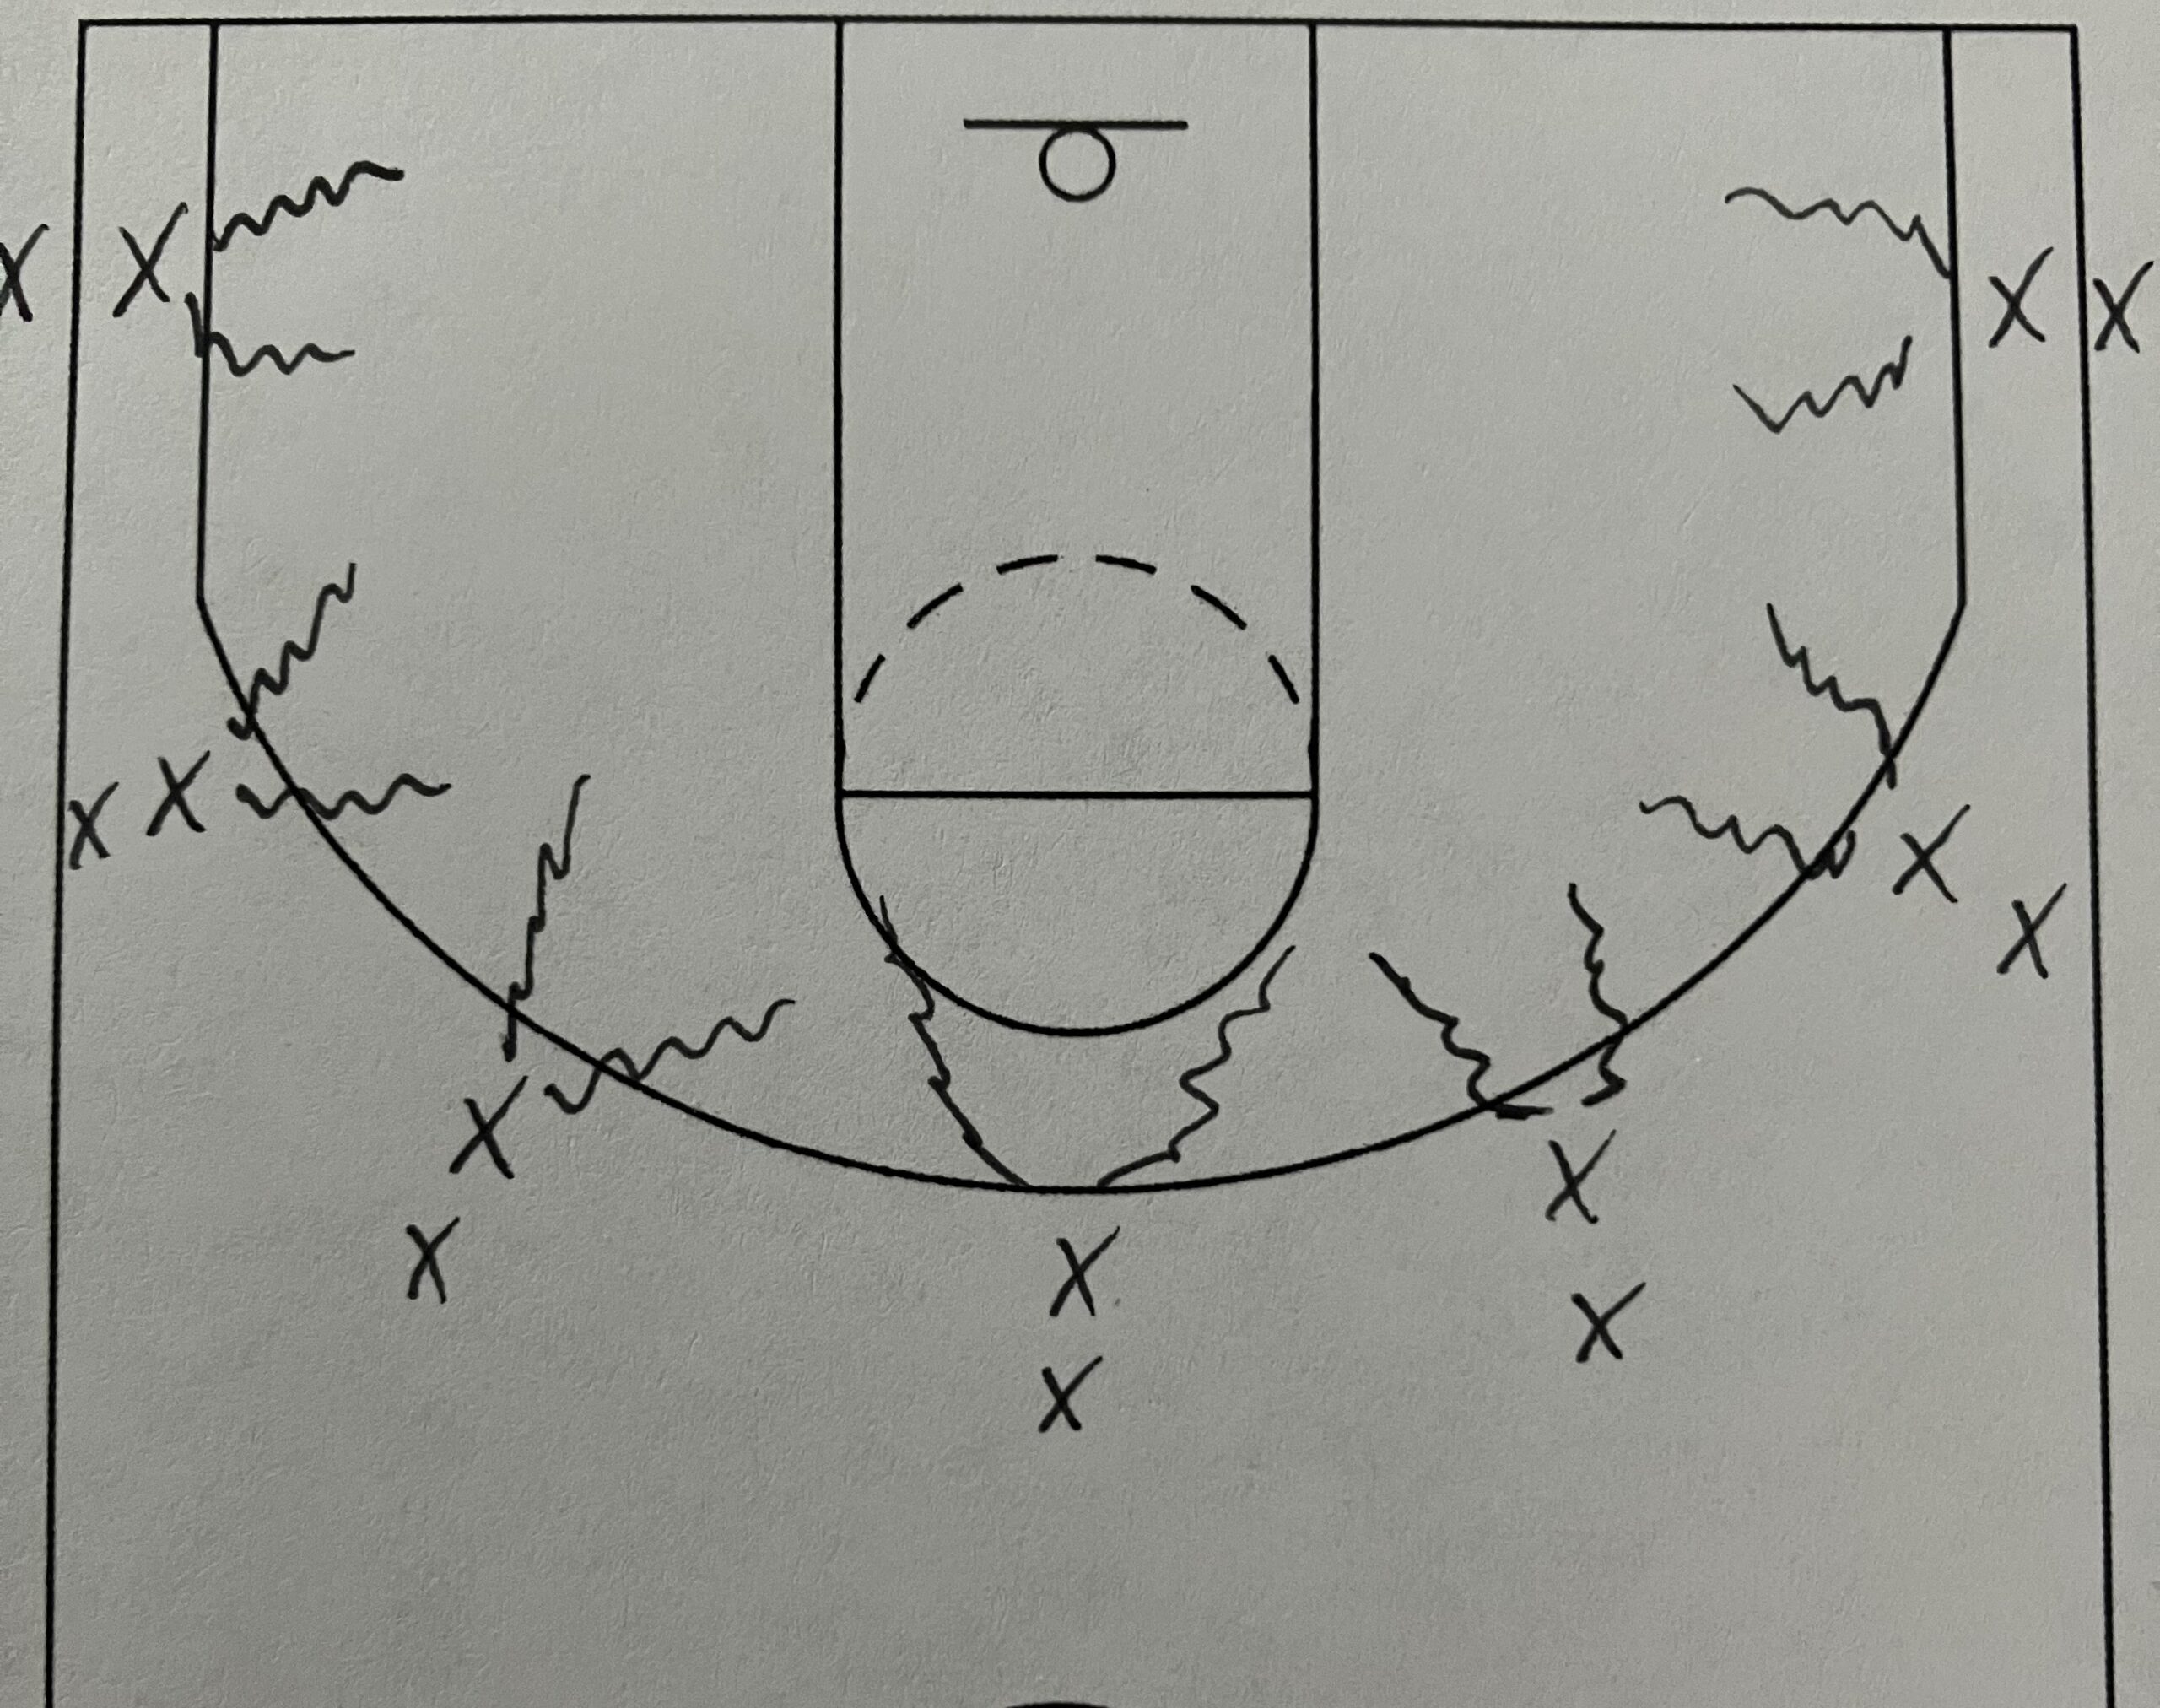
The drill is four cones set up in a diamond formation in front of the basket. The cones are labeled with C’s in the diagrams.
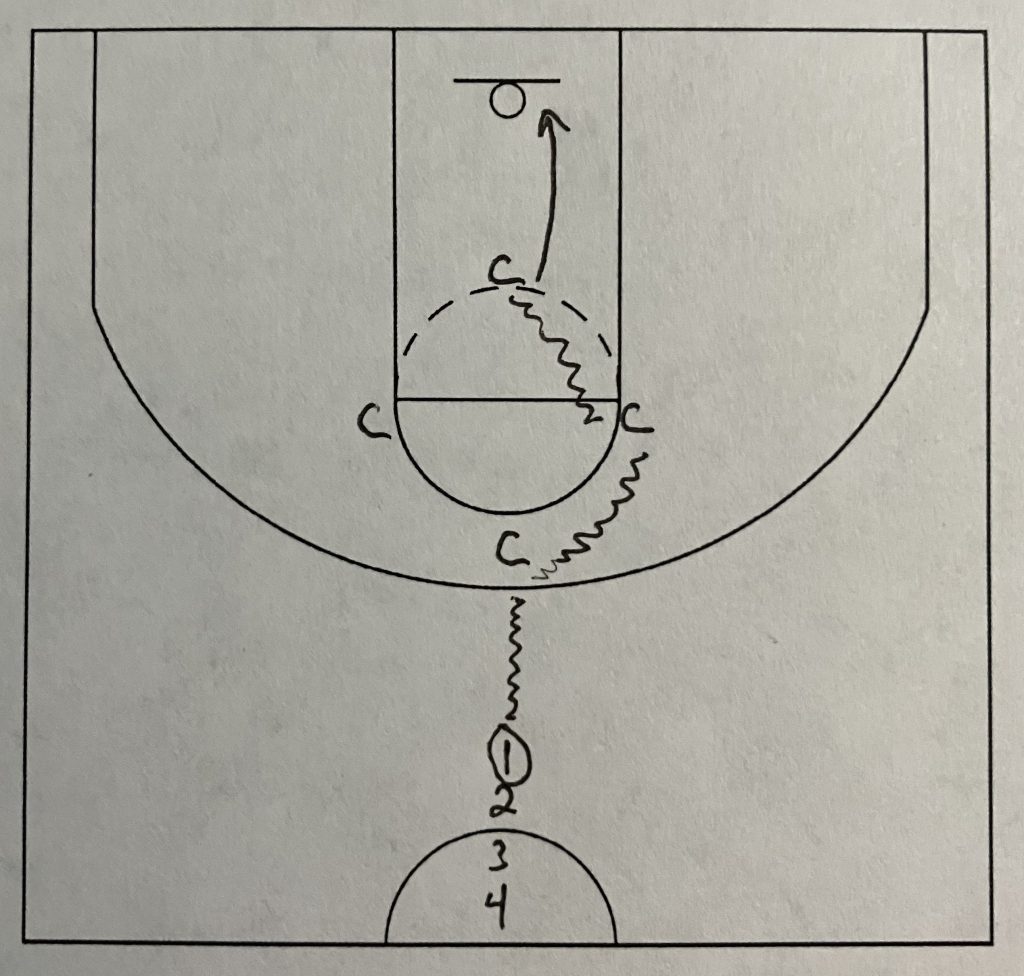
The bottom cone is in the middle of the lane around the mid-post area. The next two cones are set on the elbows or just outside of the elbows. The top cone is set on the high school 3-point line. This gives the cones the diamond formation.
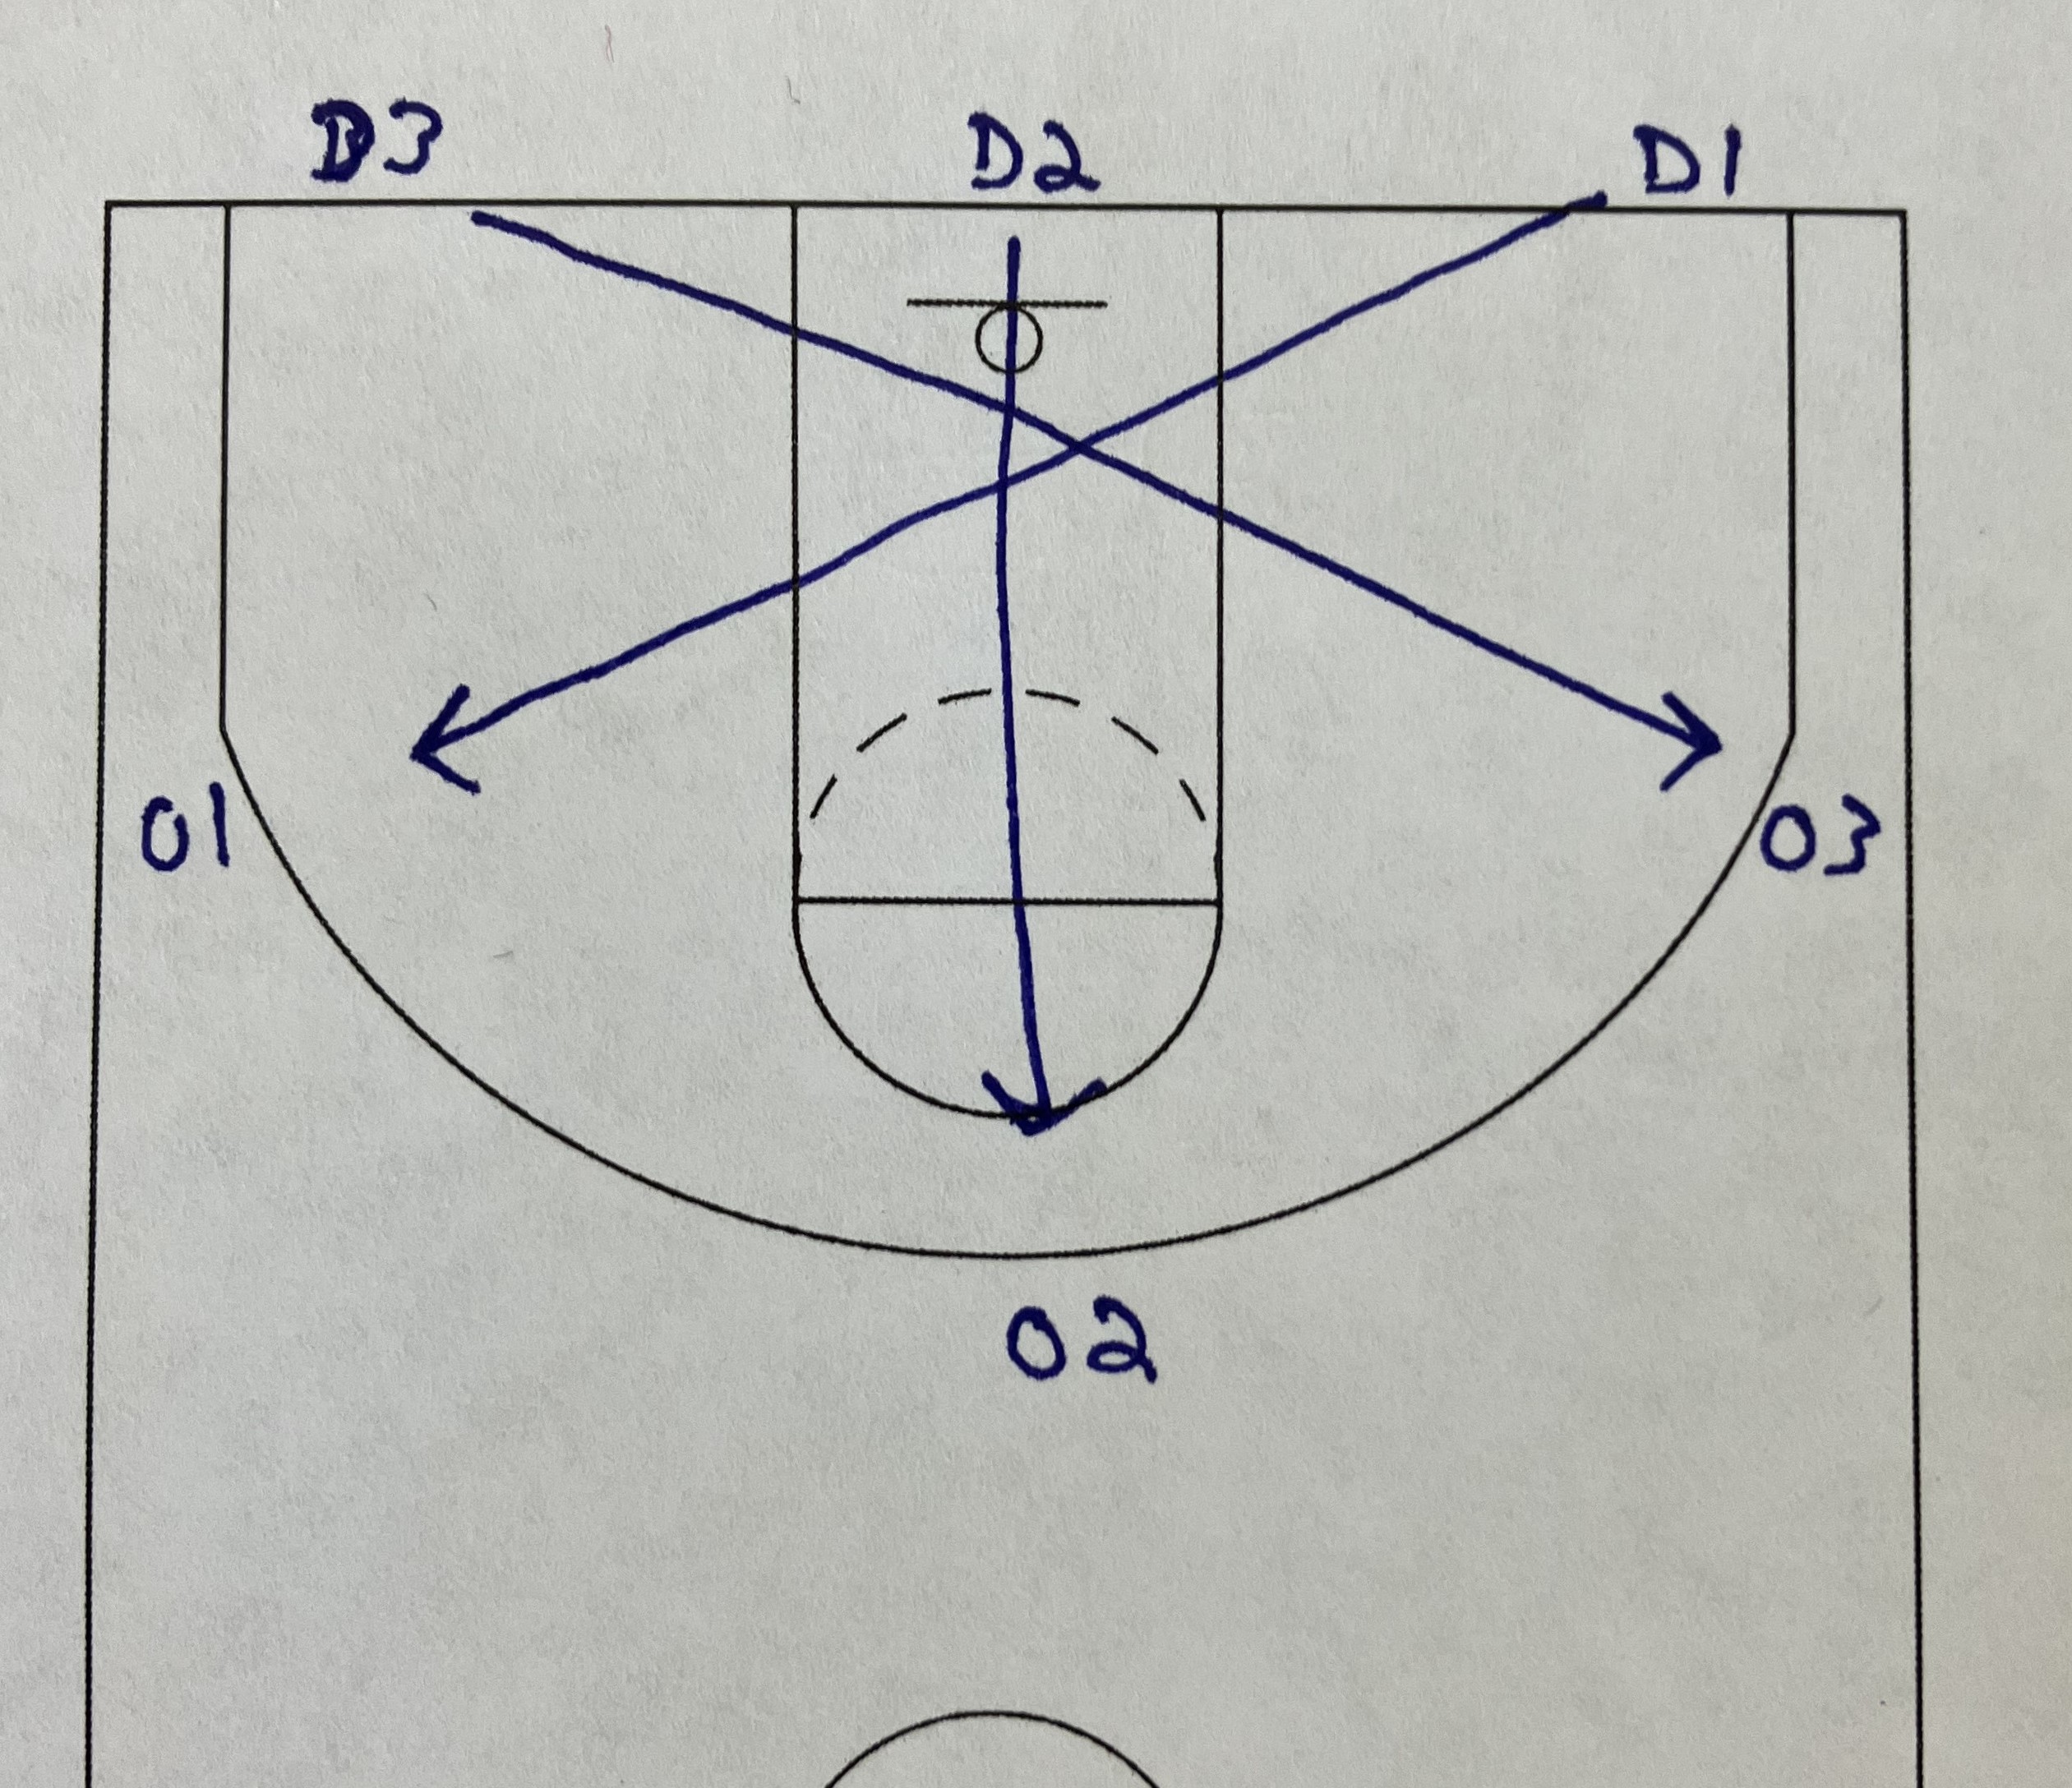
The players will all have a basketball or at least 3 basketballs will be in line. The minimum of 3 basketballs ensures the drill will never stop and the players will never have to wait for a ball. The player in the front of the line will dribble up to the first cone. They will perform a change of direction dribble and move to the elbow cone. At the elbow cone they will perform a 2nd change of direction dribble and continue dribbling to the bottom cone. At the bottom cone the player will perform a 3rd change of direction dribble or spin move and finish the drill with a layup.
The player will go in the opposite direction of the hand they start dribbling with. Using the diagram above, player 1 will start dribbling with their left hand up to the first cone. At the first cone, the change of direction dribble will put the ball in their right hand to the 2nd cone. The change of direction at the 2nd cone will put the ball back into their left hand before the final move at the 3rd cone and shot.
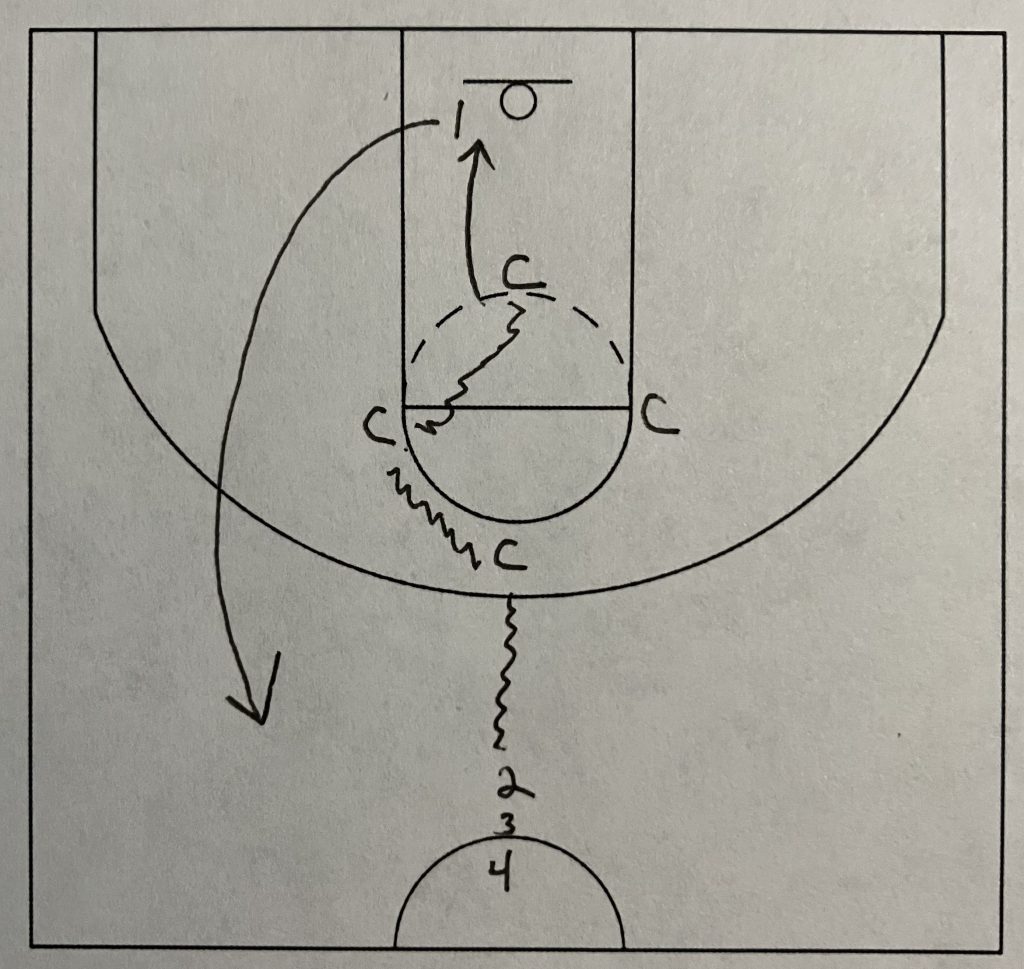
I have the players start the drill with alternating hands. So, in the diagram above player 1 will start dribbling with their left hand to start the drill. Player 2 will then start the drill with their right. Player 3 will start with their left hand and player 4 will their right hand. After a few trips, then all the players will switch which hand they start the drill with. If the drill has an odd number of players like 3, 5, or 7 then the players will automatically switch hands to go through the drill.
Player 1 is going through the cones. As player 1 gets to the elbow cone, player 2 will start dribbling up to the 1st cone. By waiting for player 1 to get to the elbow cone, they should be able to shoot their layup, get their rebound and get out of the way before player 2 gets up to the basket. This will keep the drill running quickly without the danger of players running into each other.
By alternating hands, it will force the players to work on finishing from both sides of the rim. This will force players to develop their weak hand. So, not only players going to be dribbling with both hands, they are also going to be finishing with both hands. This is great for 5th though 8th graders in getting them to work on shooting up close with their weak hand. These are the ages where they should start working on shooting layups with their weak hands. This drill will help with that by forcing the players to shoot weak handed layups during the drill.
Once the drill gets going, then the players are going to go through the cones, shoot the layup, rebound, and return back to the line. This keeps the drill moving consistently with little wasted time. Once player 1 gets to the elbow cone, player 2 will start. Once player 2 gets to the other elbow cone, player 3 will begin. This continues for the duration of the drill with however many players are in the drill.
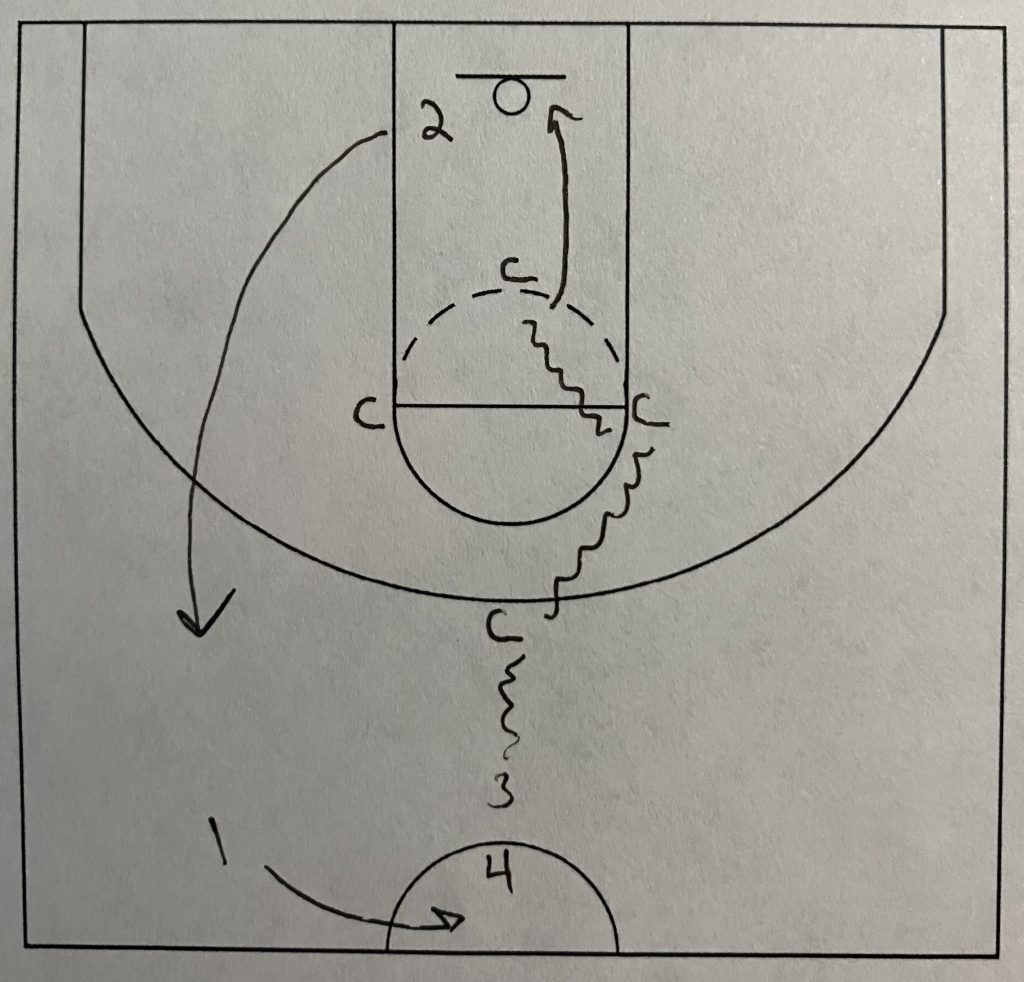
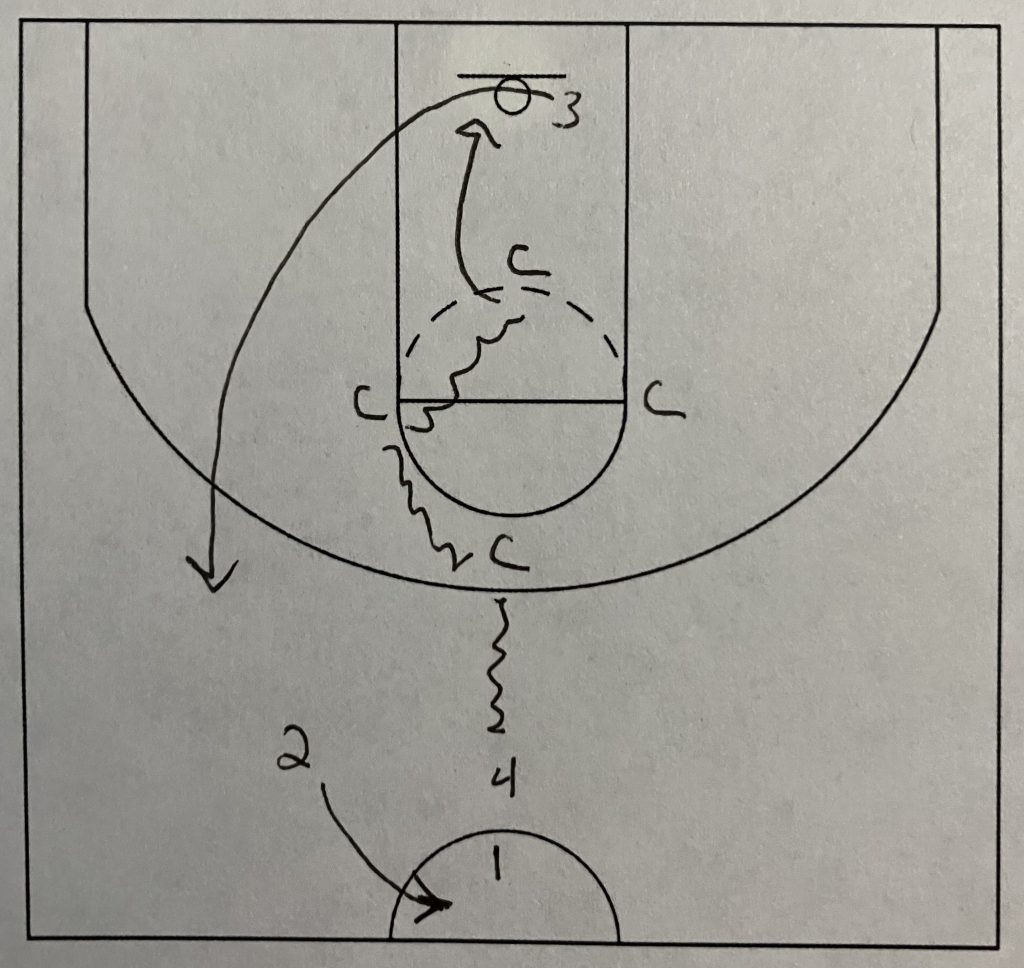
By the time the 3rd or 4th player is starting the drill, the 1st player should be coming back to the line. The pattern of the drill just keeps repeating for the entire time the drill is being ran. The players are alternating their directions as well so even though everything is close together, the chances of players running into each other are greatly reduced.
Increase Difficulty
When players are able to go through the drill well, a couple of things can be adjusted to make the drill harder.
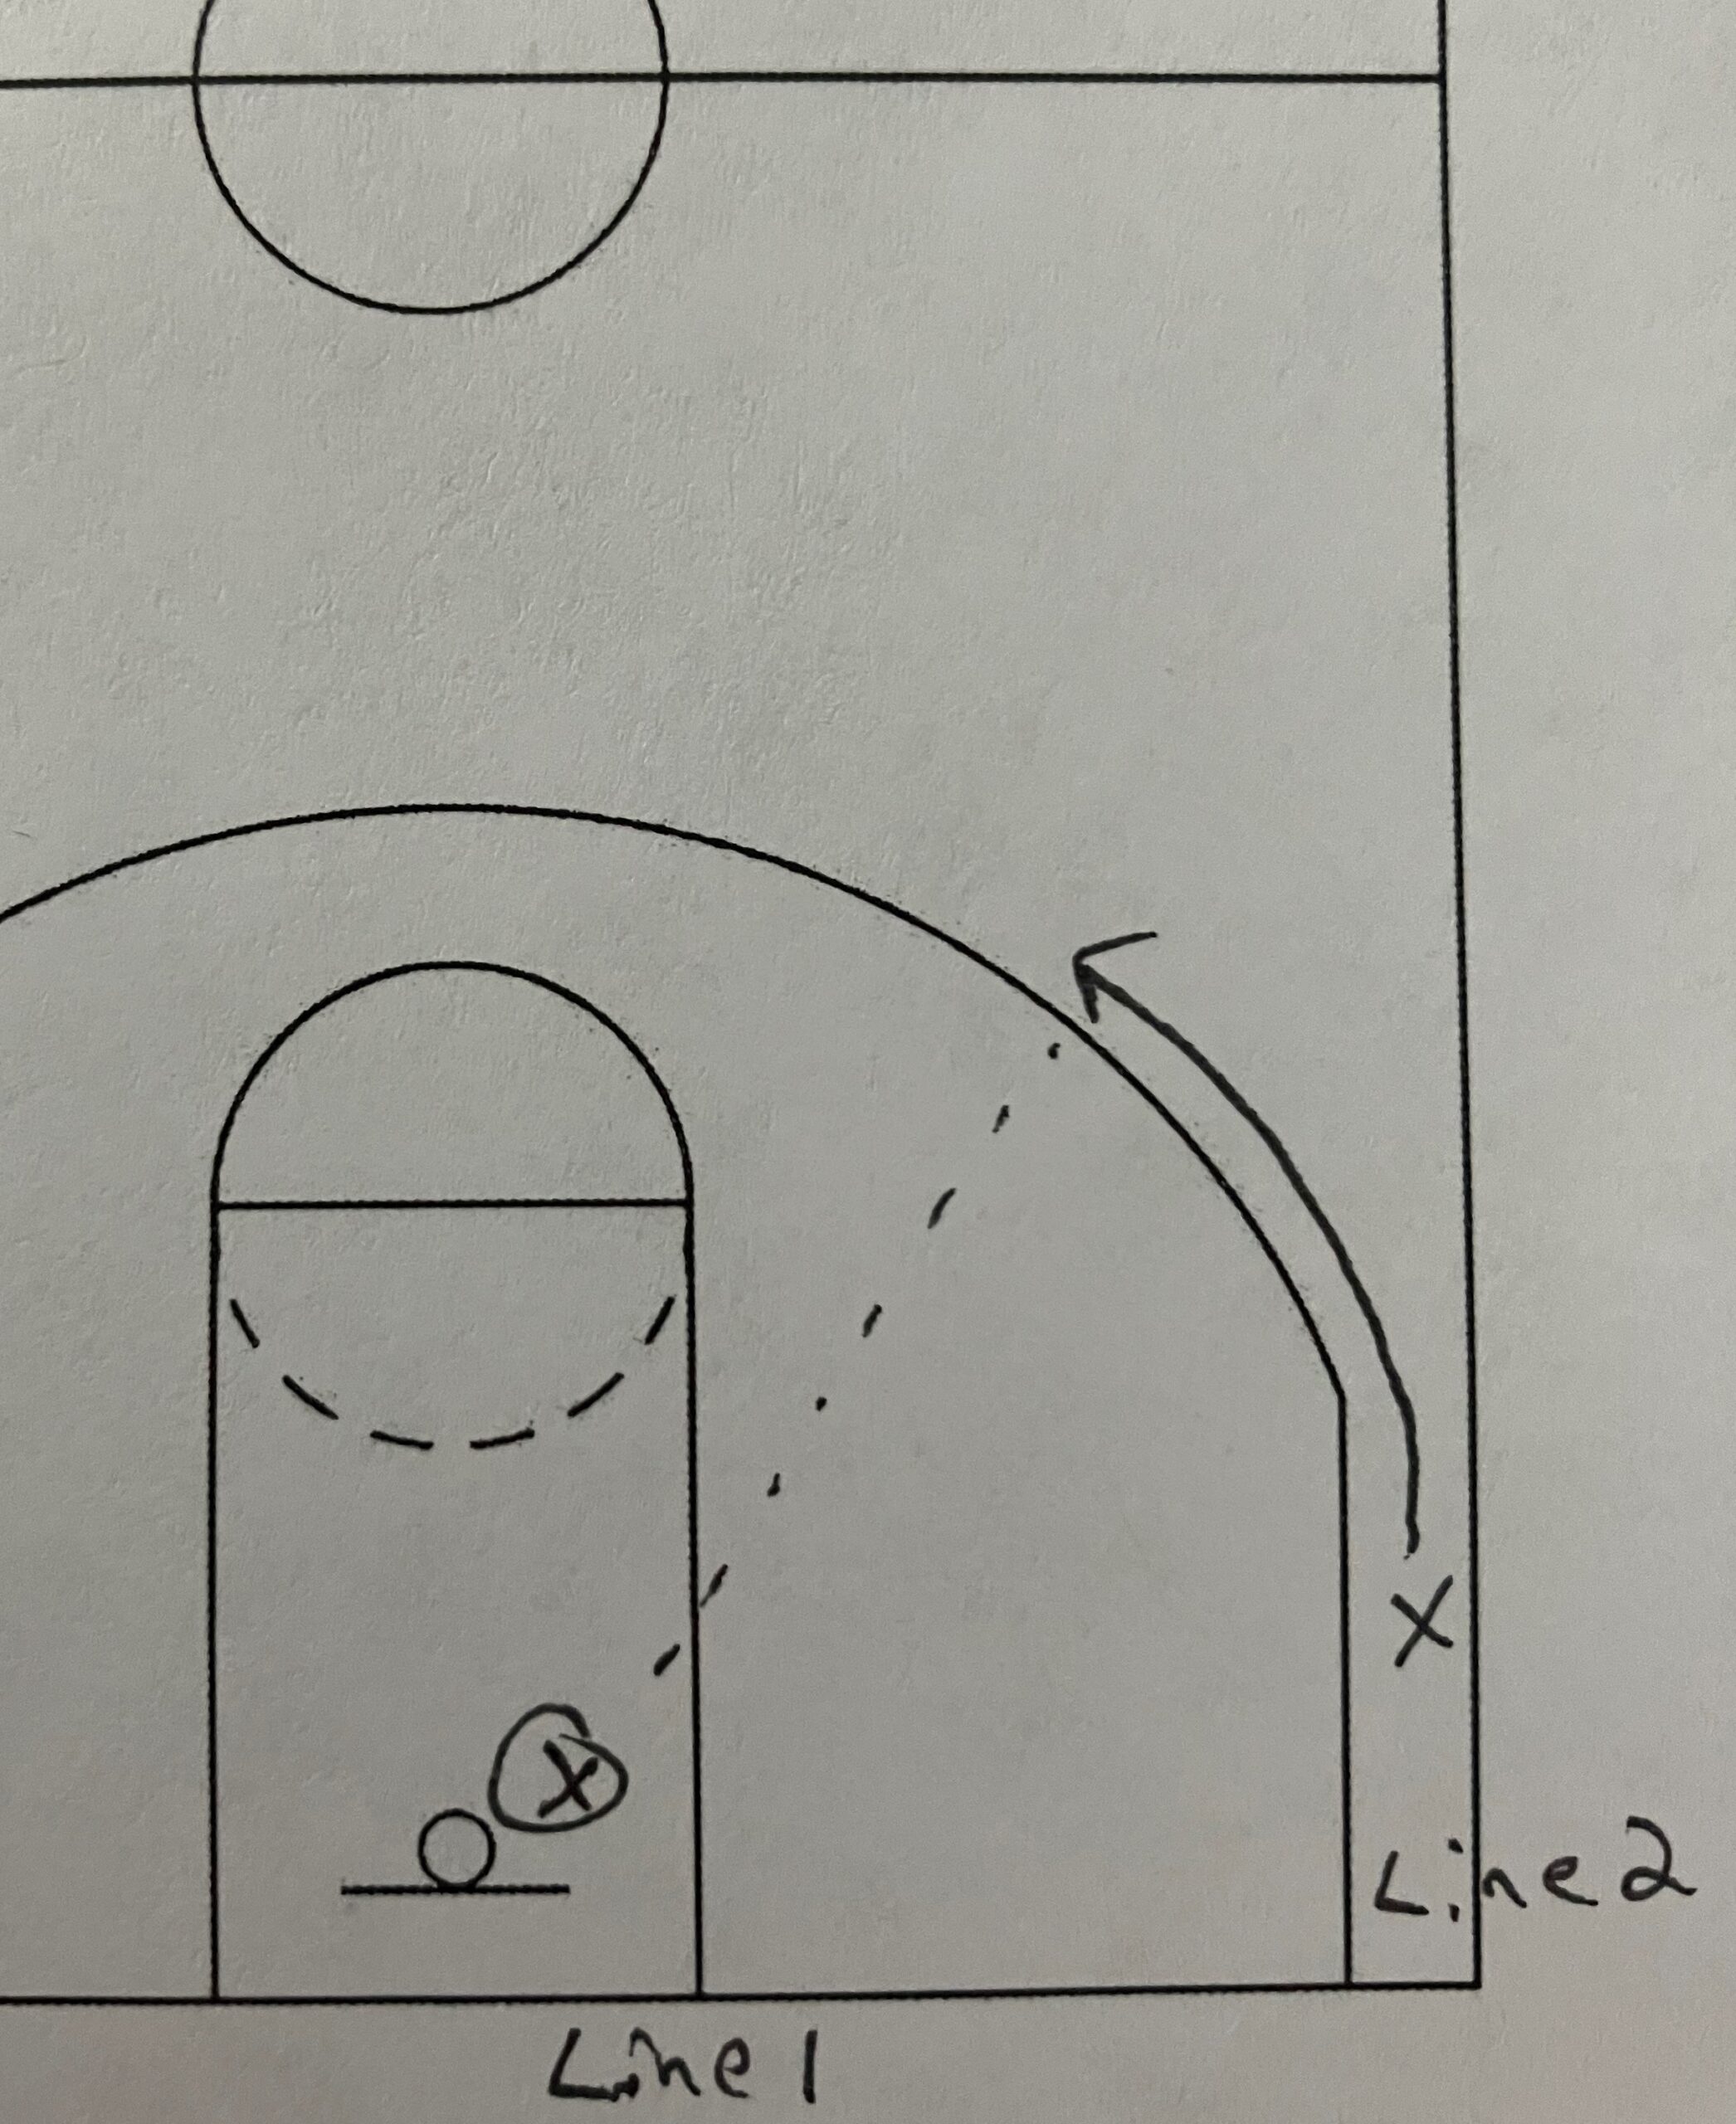
The first thing to increase difficulty is to reduce the space in between the cones. This will reduce the area the players have to move and dribble meaning their movements and cuts have to be more precise. And the next cone is going to occur sooner after each change of direction dribble, the players do not have the ability to correct their direction if the change of direction dribble takes them way out wide. The dribble and cut must be precise and straight to the next cone.
This precision helps players in games by teaching them to attack the rim after a move in a more straight line fashion. The player is attacking faster off of a move which gives the defense less time to reaction to the move.
It is also really good in helping players learn how to attack a pick and roll as an offensive player. They will learn how to turn the corner off the screen quicker and faster using less space to get to the rim. It can help players learn how to split a defensive hedge or just get downhill faster putting more pressure on the defense.
The 2nd way to make it more difficult is to make players do triple moves at each cone. Triple moves are 3 change of direction dribbles at each cone before moving onto the next cone. For instance, a player could do a crossover, behind the back, and between the legs at the 1st cone. At the 2nd cone the player does a crossover, crossover, and behind the back. At the 3rd cone the player does a behind the back, between the legs, and spin move to the layup. This forces the players to have much better control of the ball before they move onto the next cone.
At first, the players are going to struggle with the triple moves because they will want to drift as they dribble. Drifting messes up the players movement to the next cone. Players will learn to do change of direction dribbles in a stationary place before moving onto the next cone. Triple moves are great ways to increase difficulty for high school guards. They are still doing the same drill but they are learning body and ball control in the drill without being told. A player that has body and ball control will have far less turnovers then a player who does not know how to control their body and ball movement.
Decrease difficulty
For players less skilled or younger players, the diamond dribbling drill can be made easier. Instead of moving the cones closer together to make it harder, the cones can be spaced farther apart to make it easier. This gives the players more space to complete each change of direction dribble before moving onto the next cone. This is a great way to use the drill with younger players who are not good at keeping control of the ball during their dribble. This lets the drill be used for jr high players and younger players.
2 thoughts on “Diamond Dribbling Drill”